
General
– How to Preserve a Clean Routed Signal Inside a DAW
1) Processing Order
– Pitch Correction Tools Need the Best Possible Audio Resolution to Work with, that is why they Appear on Top of the Routing Chain
– EQ can also be Placed before a Compressor, but always Keep in Mind that Changing EQ will Change the Compressors Behaviour
a) Pitch Correction Tools (always at First Place)
b) Gate
c) Compressor
d) EQ
e) Slap Echo (can also be Placed Before EQ / Compressor)
d) Chorus / Flanger etc. (if it is an Integral Part of a Sound, it can be just after Pitch Correction)
2) Sends & Returns
– One of the Most Important Setups
– allows to Place an Effect to Multiple Signals in a Most Efficient Manner (such as Reverb)
– the “Sends” Come from the Individual Tracks and the “Aux” Functions as the “Return”, Bringing the Effected Signal (e.g. Reverb) Back into the Mix where it will be Blended with the Original Dry Signal
– Remember that in a Send & Return you Always Set the Effect itself (e.g. Reverb) to a 100% Mix (Fully Wet)
– to Temporarily Bypass the Send Effect, Never use just the “Bypass” of the Plugin as it will Still let the Dry Signal through, Instead use the Mute Switch of the Aux Channel
3) Pre vs Post Fader Sends
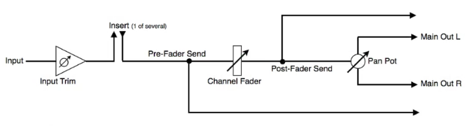
– Pre / Post Option Defines where a Send will Split Off from the Track Signal
– Pre / Post Fader being before or after the Channel Fader
– Do Not Mix Pre / Post in a Mix Session, i.e. either Go with Pre or with Post to Avoid go in Circles and make Unintentionally Level Changes
– Notice that in Cubase Post = Blue, Pre = Turkish



Post
– Post-Method is used for a Classic Reverb Send and Return Setup
– Signal is Split Off After the Channel Fader
– i.e. Lower Volume of Track will Lower the Send Amount as well or Increase the Track Level will Increase the Send by the same Amount
– this Method makes it Easier to Mix as it Preserves the Reverb Mix Balance, Once the the Send Amount is Defined
Pre
– Signal is Split Off Before the Channel Fader
– Alter Channel Volume Fader of a Track Does Not Influence the Send Level
– so even if you Increase the Track Level, the Send Level Stays the same
– i.e. Amount of Aux Send Level Sets the Definitive Reverb Mix Balance
– this Method is Good for Independent Sub Mixes
4) Sub Groups (Bus)
– Place “Related” Tracks on Groups Makes Sense
– this Method Involves using a “Bus” and Differs from Aux Pre/Send Method
– Bus Sends are simply Copies of the Channel Strips Main Signal
– so the Track Signal is Pulled Out of the Stereo Bus and Re-Routed into a Sub-Bus (Group) Before Going to the Main Output
– i.e. the Signal Path through the “Sub Group Aux” is the Only Path of those Tracks to the Main Stereo Bus (No “Split Off” the Track Signal)
– this Way all Grouped Tracks Level can be Easily Re-Adjusted together in One Step
– another Benefit is to Apply the same Process (Effects) to All Tracks
– often you can also “Link” Group Faders to Create “Mix Groups”, so a Level Change Made to One Group will also Change Level on other Groups to Maintain the Relation of Groups Individual Level
– some DAWs Provide “VCA Grouping” which is Similar to “Mix Groups”
– VCA is Primarily thought to Treat the Level of All the Group Tracks as a Unit (as in a Analog Domain)
– Notice that in VCA Groups (as well as in “Mix Groups”) the Actual Signal Paths are Unchanged, i.e. Signal are Not Actually Routed through that VCA Channel Strip
– so No Effect Processor can be Placed in a VCA Group
5) Gain Staging (Plugin I-O Gain)
– Ensure that audio Signals are at the Optimum Level at All Times as they Pass through the Various Processors and Mixer Stages
– in Analog Domain this is Crucial to Keep Clean Signals, Free of Excess Noise, Low Signal or Overload Signal that Cause Distortion
– DAWs on the other Hand All Operate with Enhanced Headroom, Regardless of the 16-Bit or 24-Bit of the Finished Audio File as 32-Bit Floating Point Resolution is Enforced in All Processing Stages
– 32-Bit Floating Point Resolution Provides an Extremely High Headroom (somewhere of 1500dB) and Dynamic Range which Makes it Unlikely to Encounter Distortion or Noise Problems
– but even here you can Optimize the Results by Ensure a Good Signal from One Processor to the Next, i.e. from Plugin to Plugin in the Insert Section to the DAW
– Distortion (if No Sustained Red Lights Appear o the DAW Master Out) or Noise Problems are Not the Problem
– but you will Not get the Best Results when a Signal Arrives Too Low or Too High to the Processor
– Beside EQs and Compressors, also “Analog Modeled” Plugins have a Specific Point where they React the Best (as the Analog Circuit is often Modeled as well)
– so it is Crucial to Re-Adjust Incoming / Outgoing Levels to “Unity Gain” from Plugin to Plugin Across the Chain, where “Unity Gain” means the same Level Coming In & Going Out
– Thanks to 24-Bit Resolution Crank Up Levels Still Results in a Clean Signal, but a Too Hot Recorded Track will Still have Distortion when Lower that Level
Gain Staging Options
a) Correct Unusual Low or High Audio Waveforms with the DAW “Trim Level” (usually Reflected by the Visual Change of the Waveform)
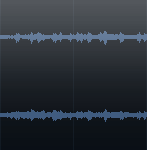

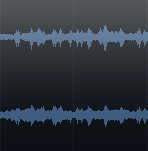
b) Re-Adjust via the Plugins Dedicated In / Out Gain Parameters

6) I-O Gain vs Effect Gain
– Beside simple Input / Output Gain Controls, there are also Effect Gain Controls that Differ in their Functions
– e.g. Certain Compressors or Amplifiers (Guitar Amps) have Modelled Analog Circuits where a “Drive” Knob is Part of the Coloration (and has Nothing to Do with “Unity Gain”)
– i.e. they may have Generic Gain Controls, but they also have Gain Controls that Model the Amount of Distortion or Compression
– sometimes the Manual of such the Modelled Plugin Unit Recommends a Ideal Input Level, to get the “Truest” Response
– if however No Generic Gain Controls are available, you either Need to
a) Increase/Decrease the Input via the Interface (for Recording)
b) or Insert a Dedicated “Gain Plugin” Ahead of the Effect Processor
7) Aux Fader
– in a Classic Post Fader Reverb Setup, the Return Fader Must Always Stay at “Unity Gain” and you Always Should use the “Send” Fader to Dial In the Proper Amount of Reverb
– i.e. Do Not Change the Channel Fader to Correct the Amount Reverb being Sent, as this will Affect the Level of the Track as well and Changes the Overall Picture Instead just Send Effect
– also Do Not Change the Return Fader to Correct the Amount of Reverb, Always use the “Send” Fader
– in Rare Cases an Engineer can Automate the Return Fader to Balance the Reverb Return for Whole Sections / Passages (but get the Habit to use the Send)
8) Master Fader
– Do Not use the Master Fader as a Volume Control
– always Let the Master Fader at “Unity Gain” as it Represents the Calibrated Listening Environment, i.e. should Reflect the 83dB – 85dB Listening Level throughout
– so either use a Hardware Volume Control, the Virtual Mixer of the Interface or Insert a Dedicated Plugin into the Stereo Out (Main Out) Channel
Leave a Reply