
General
– Minimalist Music is Music that works with Limited or Minimal Material and often with Repetitive Structures
– it is Not about Voice Leading, Going from C to F or Chord x to Chord x
– means as Orchestrators you need to Expand by Using different Planes of Tone and Shifting Instrumentation, as well as Develop the Music itself
– the Focus is to Draw Attention to the Smallest Fragments in a Composition by the Usage of Techniques
– we Work from De-Construction to Re-Construction
De-Construction
– in De-Construction we Check the Main Approach (Characteristics) of Minimalist Music by 3 different Approaches with some Examples
Approach 1
– Using only a Few Notes (Dense in Terms of the Arrangement but Not in the Notes that being Played)
– Drones (Sustained Notes either all the Way Held or Repeated)
– Phrases that Move in Endless Cycles (Broken Arpeggios then Connected by Themselves differently)
– Takes a Very Long Time to Gradually Change over Time (therefore often 10 Minute Songs but this Technique can be “Condensed” to Shorter Pieces)
– “Ostinato” by the Usage of Arpeggios and Repetitive Motifs (a Recurring Motif that just Keeps Repeating over and over again, throughout)
Example Approach 1 (Am, 4/4)
1) Start Song by the Creation of a 4 Bar Whole Note Sustained Drone in “A” (Bass Range), Repeated and Layered by 3 different Instruments (in a Cycle throughout the Song)
2) Along the Drone, a Melody (Principal Theme) follows also from Start (Melody has a 2 Bar Break and then Starts over)
3) Create a 4 Bar 1/8 Note Arpeggio Ostinato (A,C,A,E,A,C,A), Played by 3 different Instruments (Insert at the Motifs First Break)
4) Double the exact same Melody with 2 New Instruments (sometime after the Arpeggios)
5) Add a Simple 4 Bar 2 Note Harmony Whole Note Pattern with Note A+C then A+D
6) Double the Arpeggio in a fairly High Register
7) Triple the Melody with another Instrument (exactly the same Melody)
8) Double the 2 Note Harmony with Horns
9) Build gradually over Time to get more and more Dense in the Sound
Approach 2
– “Slowing Down the Speed of Rhythms” gradually over Time, through Offsetting a Copy of a Line (can derive from Inside 1 Midi Block or from 2 Blocks)
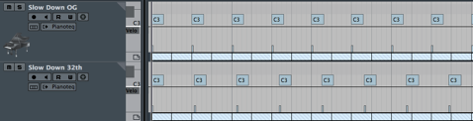
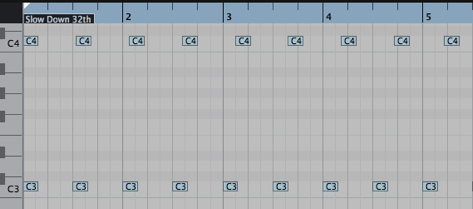
– “Gradual Offset” through a 32th Note Gradual Offset between 2 identical Blocks (deriving from 2 different Midi Blocks with same Content, One Blocks has simply a 32th Offset)

– Consonant Harmony Involving Exact Repetitions of the same Material Offset in Time (Minimalism is often “Consonance”, with Material slightly Offset to each other you get kind a desired “Phase Effect”)
– Steady Pulse (the Ultimate Anchor in the Piece to give the Listener a Hold)
– Odd Percussion Sounds (Found Percussion) or Natural Sounds
– Repetition and Gradual Transformation of Musical Phrases, Figures, Motifs or Cells (can be just One Note of a Larger Part in a Phrase you Draw Attention to it)
– Additive Progress, Phase Shifting (means to Offset Material so the Phase Relationship Changes over Time which can be Done by Double a Instrument with the Exact same Phrase but Alter the Length of the Region slightly 1 1 1 16 instead 1 1 1 1)
– “Austere”, Little Embellishment of the Principal Theme (the Theme will Experience Very Small Changes throughout the Composition)
Example Approach 2 (Am, 4/4)
1) Start Song with a Looped 2 Bar Steady Pulse which in this Case is a Short Percussive Element on Beat 1 + 3
2) Add another 2 Bar “Offset Focused” Percussive Pattern, which Slows Down the Speed of the Rhythm over Time
– this 2 Bar is then Copied over and over with a 32th Offset in One Giant Block
– Start it along with the Steady Pulse, but every 2 Bar it has a 32th Note Offset throughout the Piece
– Notice that the Offset is Made in the Internal to get the Slow Down Effect (Not a Gradual Offset Effect per Block as later)
3) This 2 Bar “Offset Focused” Percussive Element is Doubled with a Short Violin Sound with different Placed 32nd Offset
– so the Percussive Element and the Violin Start Diverging over Time, e.g Moving Farther apart from each other
4) Then we Introduce a 4 Bar Gradual Offset Pattern with a 2nd Short Violin Sound, means every New Whole 4 Bar Block has a 32th Note Offset
– this Offset is per Block (Not a Giant Block where the Offset is Made Internal)
5) Create with 2 New Instruments (Cello and Bass) with the same Approach of a Gradual 32th Offset (Blocks) in Time to Give a Phase Shifting Effect
– use a 4 Bar Pattern with a Note E on 1 + 2 per Bar
– simply Offset either Cello or Bass Block to the other by a 32nd Note Distance (use Arrange)
6) Create a b Bar Melody (Principal Theme) that Repeats throughout the Piece ( this will be the Only Steady Element beside the Steady Pulse)
7) Towards the End, Bring the 2 Short Violins together again by Shift the Blocks in the Opposite Direction
Approach 3
– Limited Instrumentation
– Using only a Few Notes
– Slow Automation / Modulation of Plug-In Parameters over Time
– Modulate One or more Parameters slowly over Time
Practical Tricks Approach 3 (Am, 4/4)
1) Introduce a Flutter by a Delay to a Short Ostinato, that gradually gets Louder until it Creates a Sort of Texture
– Movement is Not Done by Changing Musical Content but with a Process in the Modern DAW with Plugins
2) Introduce a Echo Plugin on a Short Percussive Track with Echo Repetitions Increase Gradually over Time and parallel the Dry Signal (Direct Signal) Fades Out until just the Wet Signal is being Heard
3) Use a Distortion Unit to Make a Clean Signal Distorted over Time which is another Aspect of Changing the overall Sound without Changing Notes
4) Double a “Woodblock” Instrument with the Exact same Phrase but Alter the Length of the Region slightly
– means the Doubled Block for Example has a Length of 1 Bar plus an Extra 16 (means 1 0 0 16 instead 1 0 0 0)
– this will Demonstrate very Clear the Phasing Effect

Re-Construction
– in Re-Construction we Explore Ways to Elaborate and Expand on Thematic Material using Re-Harmonisation, Modulation and Meter Change
– Mainly we Search Ways to Vary the Principal Theme in Creative Ways to make the Music interesting and this is what Orchestration is all about
Devices to Expand on Re-Construction
Re-Harmonise
Modulate
Change the Time Signature
Play the Melody in different Rhythms
Stretch or Shorten the Melody
Modern Harmony
Change the Tempo
Thematic Variations
Re-Harmonise
– means different Harmonies (Chords) under the same Melody (Classic Approach)
1) Compose / Outline a Basic 8 Bar Principal Theme with Chords and Melody in a desired Key (here Am)
2) First we Re-Harmonise the Melody, by using the Relative C Major Scale Chords instead Am Scale Chords
3) Means the Melody Stays exactly the same but the Chords are Taken from C Major which will Dramatically Alter the Principal Theme
Modulate
– means take the Content and Move it to Another Key
– every Modulation by a Certain Scale Degree gives a Certain Type of Feeling which is something to Consider for the Ideal Response
– this can be Effective if you need to Extend a Song by a Couple of Minutes, but you Want to Preserve the overall Integrity
1) Compose / Outline a Principal 8 Bar Theme with Chords and Melody in a desired Key (here Am)
2) Modulate the Content Up a 4th from the Point to Extend On with Proper Modulation by Circle of 4th/5th, Inversion e.g. Nearest Notes
3) Means the Content Stays exactly the same but Yet Playing in Another Key (can be Diatonic Degree or Not where Knowing the Effect of certain Modulation Intervals is Experience)
Change the Time Signature
1) Compose / Outline a Basic 8 Bar Principal Theme with Chords and Melody in a desired Time Signature (here 4/4)
2) Change the Meter to 3/4 and Spread the Content to Fit the New Time Signature
Modern Harmony
– Re-Harmonising a Principal Theme can also be Done with a more Modern Approach so that the Melody Notes are used as Upper Extensions to Underlying Chords
– Jazz Re-Harmonisation involves the Use of 2 – 5 – 1 Harmonic Movement ( 2- 5 Cadence)
– you Don´t Change anything in the Melody (No Transposition), but you simply Look at the Notes differently than before (Connect Extended Chord Notes)
– this Approach Takes you to a Whole different Harmonic Correction
Example Based on Stacking Thirds (Tertian Harmony)
– means the Classic Way of Stacking 3rd + 3rd + 5th
1) For Example a C is No more the 3rd of Am (or the Root of C Major), but to Look at the C as the Flatted 5th of an F#m (F#m-5)
– so you Extended that Part and Place here a F#m-5 Chord to Re-Harmonise
2) or the Melody Note “C” could also be Referred to a Flatted 9 of B7
– so you Place here a B7 Chord to Re-Harmonise
3) or the Melody Note “E” could also be Referred a Bb Sharp (13) 11 Chord
– so you Place here a Bb#11 Chord to Re-Harmonise
Example Based on Stacking Fourths (Chordal Harmony)
– this is Kind a Ambiguous Approach to the Tonal Centre (Kind of Modal Feeling)
– simply Stack 4th + 4th +4th
– the Idea is to Voice Fourths intelligently that Work with the Melody Notes and get Open Fourths, respective Open Fifths if you Invert them
– the Use of Pedal Tones Underneath Moving Chordal Harmony creates an “Inside-Outside” Modal Style Sound (Pedal Tones to Move Chromatically either Up or Down)
1) For Example over Melody Note C, you Stack 4ths based on the Current Scale (here Am)
– this means (A) + 4th +4th +4th = (A) + D + G+ C Note Stacked as the New Chord
– so you Place here a Am7 Add 11 No5 Chord to Re-Harmonise
2) Or over Melody Note E, you again Stack 4ths
– this means (E) + 4th +4th +4th = (E) + A + D + G Note Stacked as the New Chord
– underneath is a Pedal Tone in the “A” with a Bass Sound
– so you Place here a Em7 Add 11 No5 Chord to Re-Harmonise
Thematic Variations
– this Approach is to Elaborate / Expand more on the Melody (Versus Re-Harmonisation Harmonies)
– Focus is on the Motivic Development where Composition and Orchestration get Blurred
– Thematic Variations is a Fundamental Thing Orchestrators Do to Create New Music based on the same Original Motif
– of Course some Techniques can also be Applied to Harmony Structures
– Try to Mix and Match the Variations
Repetition Variations
– One Way is with Exact Repetitions of the Principal Theme by using Fragments of the Original Melody
– Exact Repetitions Involves a Literal Repeating of Selected Fragments of a Melodic Phrase as a Way to Create Variations
1) for Example take an Ascending Part and Repeat Once, let it Flow and then Repeat an Descending Part Once
Sequential Variations
– Another Way is a Sequential Repetition by Using a Part of Melody and Repeat it Up or Downwards
– Sequential Repetitions Involves Repeating Motifs on different Degrees of the Scale
– often (but Not always) Ascending or Descending Diatonically
1) for Example a Melody in Am Starts with A, B, C, and then Repeat the same Melody Once but Starting the Interval from C which gives C, D, E (then let it Flow and Repeat other Parts of the Motif)
Retrograde Variations
– Playing Phrases in “Retrograde” is more of a Mathematical Approach
– Retrograde Involves Playing Phrases Backwards and Inverting either the Intervals and/or Rhythm
– you Reverse both, the Intervals and/or Rhythm Exactly the same
– basically the Whole Thing is Played Backwards, where the “Whole Thing” can be either the Complete Melody or only Parts of the Principal Theme
1) For Example we have the Melody A-B-C, in Retrograde this is simply C-B-A
– the Whole Thing Backwards
– means Starting with the Note at the End of a (Retrograde) Part and Descending from there
Intervallic Expansion Variations
– the Exact Opposite of Contracting Intervals and Involves Repetition of the Melodic Motif using Larger Intervals
– means we are Altering the Intervals of the Melody by making them Larger
– Kind of Augment the Intervallic Distance
– Varying the Shape of a Melody by Creating Widening Intervals between Notes
– this only affects the Melodic Interval but the Contour and Rhythm stays the same
– when Using Intervallic Expansion, the Intervals can be Made Larger by any Amount, Not necessarily by a Single Number (means a 3rd doesn’t have to become a 4th, but can become a 5th, 6th or 7th)
3 Options for Intervallic Expansion
a) One Single Interval May be Expanded
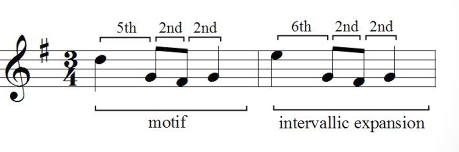
b) Multiple Intervals May be Expanded
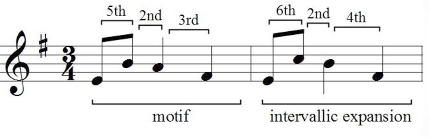
c) All Intervals May be Expanded
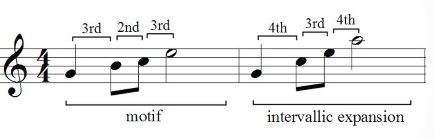
Example Expansion Ascending Mode
1) For Example in Am, instead going Stepwise the Melody A-B-C, in Expansion Mode you Play A-C-E
– so to Expand in Ascending Mode, you generally Take the Nearest Note to Root and Placed that at Two Intervals above the Final Destination Note in Range of Theme or Part of it
Example Expansion Descending Mode
1) instead of Descending Stepwise the Melody B-A-G as Original, you Expand the Interval and Use D-B-G
– so to Expand in Descending Mode, you generally Leave the Final Destination but Replace the Start Note (First Note of Descending Melody) with a Larger Interval above it
Intervallic Contraction Variations
– also Called Intervallic Compression
– simply the Opposite of Expansion
– means we are Altering the Intervals of the Melody by making them Smaller
– has also 3 Options as the Single Interval May be Compressed, Multiple Intervals May be Compressed or All Intervals May be Compressed
– Intervallic Relationships within a Melody are Made Smaller (sort of Diminish the Intervallic Distance)
– this only affects the Melodic Interval but the Contour and Rhythm stays the same
Contraction Ascending Mode
1) For Example in Am, we have the Melody A, B, C, but in Intervallic Contraction we use Note Bb instead of C and Play A-Bb-B
– means we Shorten the Intervallic Distance by Taking the Destination Note away and Replace it with another Note available in the Range of Melody or Part of it
– you basically Check what Notes in the Total Range of the Melody (or Part) are available (Not used) and “Replace” a Note with a New On available while Keep the Contour
– since in this Example from A to C only Bb is available we Use that and Replace the C with Bb
– Notice we Do Not Replace the B with Bb since A-Bb-C would make the Interval Not Smaller but Staying the same
Contraction Descending Mode
1) For Example in Am, we have the Melody B, A, G, but in Intervallic Contraction we use Note Bb instead of G and Play B-Bb-A
– means we Shorten the Intervallic Distance by Taking the Destination Note away and Replace it with a Closer Note and only Bb makes the Interval Smaller in this Case
Ornamentation Variations
– Instead the Principal Notes of the Melody, you Take Diatonic “Neighbour” Notes (mostly Diatonic and Occasionally Chromatic)
– “Neighbouring Tone”s are Adjacent Step Wise Scale Degrees
– this is a Way to Embellish the Theme and such Neighbour Notes can Just be added to the Original Theme
– to Add Decoration around the Strong Tones with usually Neighbour Tones belong to the same Scale or Key
Rhythmic Augmentation Variations
– Basically we Stretch Out the Rhythms of the Melody so that it Lasts Longer
– Process of Elongating the Rhythmic Values of the Notes within a Motif
– Preserve the Patterns of Long and Short Notes
– can be the Whole Melody or Parts of it
– generally use a Consistent Ratio of Conversion
– this can any Ratio whereas a Classic 2:1 Ratio would Doubles the Length by 2, means 1/4 Note becomes 1/2 Note, 1/8 Note becomes 1/4 Note or a 2/4 Meter becomes 4/4 etc. (so everything is Twice as Long)
– there is No Rhythm Change at all, you Transform to the same Amount of Measures as the Original Line (Changing the Meter is Optional)
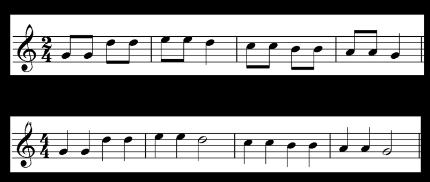
Rhythmic Diminution Variations
– Basically you “Dense” the Rhythm to Make it Quicker
– Process of Shorten / Contract the Rhythmic Values of the Notes within a Motif
– Preserve the Patterns of Long and Short Notes
– can be the Whole Melody or Parts of it
– this can any Ratio whereas a Classic 2:1 Ratio would Cut the Length by 2, means 1/4 Note becomes 1/8 Note, 1/8 Note becomes 1/16 Note or a 4/4 Meter becomes 2/4 etc. (so everything is then Half as Long)
– again, there is No Rhythm Change at all, you Transform to the same Amount of Measures as the Original Line (Changing the Meter is Optional)
– for Example the Original 3/4 can be Diminished to a 3/8 or a 6/8 Meter
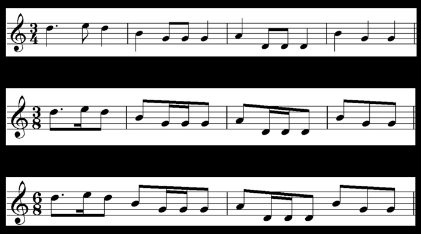
Fragmentation Variations
– you Take an Isolated Fragment of the Melody, Work with that and just Repeat it
– Separating Fragments from a Larger Motif, as a Means of Building or Shaping an Alternate Melodic Line
– For Example Isolate a Ascending Part, a Descending Part and a Custom Part
– these Fragments can be Distributed to different Places on the Scale
– Sort of Re-Building a Theme based on Fragments of the Original Motif
Simplification Variations
– you Take the Essence of the Principal Theme and Strip it Down to the Bare Essential Notes
– means Passing Tones and Neighbouring Tones are Removed, leaving only the Principal Melodic Tones to Outline the Theme
– basically “Mute” Notes in-between while the Essential Melody Target Notes Remain
Modal Change Variations
– a Very Important Option for Variations
– Involves Moving from Major to Minor (or Vice Versa)
– or Changing Intervals to Fit other Modes (Dorian, Phrygian etc.) (
– Notice that Minor/Major Modal Change has the Most Dramatic Effect
1) For Example you have a Am Melody A-B-C-B-A-G, in a Modal Change you simply Adapt the Melody to A Major Notes which is A-B-C#-B-A-Ab
– so we basically “Majorize” the Original Melody
Reprise and Coda
– Summary of Principal Concepts and Concluding Thought on How to Approach Orchestration
Changes of Timbre
– Should Happen in Logical and Musical Contexts
– Best Between Phrases of Between Sections (so Not Randomly within a Phrase)
– if you Do it between a Phrase, Do it at a Relevant Point Musically
– it is useful to Underline Motivic Changes, Climaxes and Cadences
– Add or Remove Timbers can Create Tension or Relaxation
Use Dynamics
– Add / Layer additional Instruments for Accents where Necessary
– Change Playing Technique or Articulation
– Maybe Use Staccato Sounds or Double Stops (in String Parts)
– Use Crescendo and Diminuendo (Ramps Up and Down to avoid Stiff Volume)
– Have the Texture get Thicker or Thinner where Necessary (by adding or Removing Instruments)
– Reserve some Orchestral Textures for Big Climaxes
– in other Words Big Cadences or Big Moments only Happen Once or Twice in a Whole Piece, so those Moments you need additional Elements (don´t use all Tools too Early or at Once)
Maintain Continuity
– Maintain Continuity with Regards to the Degree of Timbral Change
– a Change of Sections needs more Contrast than a New Phrase or Motif (means to stay Consistent and more or less Add One New Instrument to a Phrase whereas in a Section you might Add 2 or more)
– if you Add Whole Lot a New Stuff within a Phrase, you might Confuse the Listener as He/She thinks that is a New Section
– Timber Affects the Perception of Form, so simply think of Timbral Changes as Punctuation where sometimes you just need a Comma or Period and other Times a New Paragraph
Degrees of Timbral Change
Mild Contrast
– Move from a Lower Register to a Higher Register of the same Instrument
– Change between Adjacent Members of the String Family (for Example from 1st Violin to 2nd Violin or to Viola)
– Change between Adjacent Brass Sections (for Example from Trumpets to Trombones)
Moderate Contrast
– Change Instruments within the same Family (for Example from Oboe to English Horn)
– Use Extreme Registers in the same Instruments Range
– Change Instruments between Sections (for Example from Bassoons to French Horns)
Strong Contrast
– Change between Instruments that Do Not Blend well together (for Example from a Oboe to a Clarinet)
– Change the different Articulations (for Example Legato to Pizzicato Strings)
– Add Percussion Elements to Double or Add to the Rhythms
Instrument Ranges
– Be Aware of the Ranges of the Instruments as you’re Orchestrating
– Passages, Alone in either the Higher or Lower Range Provide Nice Contrast (means to sometimes Place a Flute in a very High Register or a Trombone in a Very Low instead of the Most Used Registers can be Effective in Contrast)
– Extreme Registers should Not be Used Constantly
– Tutti Passages (the Entire Orchestra together), Should Fill the Whole Range
– You need Less Instruments at the Extreme Ends of the Range to Stand Out in a Tutti (for Example a Piccolo at the High Register is “Better” than 2 or 3 Trombones with French Horns in the Low)
– Temporarily Orchestrating with the Holes in the Middle of the Range can be Effective on Softer Passages (means when you Harmonise or Spread Out Notes Vertically on the same Plane of Tone, you can Leave some Holes in the Register)
Unison Doubling
– Don´t Overuse “Doubling” and avoid Copy and Paste Contents
– Unison Doubling with the same Instruments adds Volume (Does get Louder but it Does Not Change the Colour of the Sound)
– Unison Doubling with Different Instruments instead, does Change the Colour of the Tone
Balance
– Usually the Top Line Normally Attracts the Most Attention (“Top” means the High Frequency Notes)
– but Movement, when Contrasted to Static Parts Draws the Ear In, regardless of Register (for Example a Bunch of Strings Playing a Static Harmony and you have the Viola Moving around in the Middle of that, the Viola Movement Draws more Attention even though the Violin is Higher)
– too Much Activity, Movement or Counterpoint can be Distracting
– Make Sure there is Contrast of Register, Timber or Rhythm between Planes of Tone (means if you have Background and Foreground Objects, try the Background Objects with more of a Resonance, Dull and Softer Timber versus Foreground Objects with a more Dynamic Part)
– Be Aware of which Planes of Tone are Foreground, Background or which are Meant of an Equal Level
Leave a Reply