
General
– Think About the Whole Range of the Spectrum from 20Hz to 20kHz
– Slice it Up in a Way that Each Individual Instrument is Gonna Occupy Mostly One of those Frequency Bands
– you Must Detect the Competing Instruments and Decide which One to Compromise or which One to Feature
– also Here it is a Good Practice to Embed Mono Mix Techniques
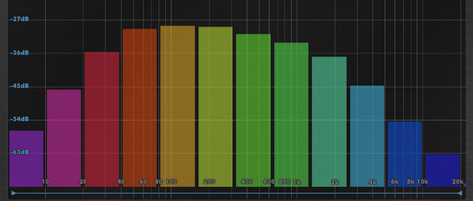
The 10 Octaves we Hear
– Almost All Sounds Contain Energy in at Least Six of this Octaves
– Octave 1 has Almost No Useful Information, but Still Dramatic, Fun and Important to Play with
– Octaves 2 to 3 Provide Critical Bass Energy and Need Great Care, Attention and Aesthetic Nourishment (Tender and Touchy)
– Octaves 7 to 10 are Almost Exclusively Overtones
| ATTRIBUTES | FREQUENCY RANGE HZ | OCTAVE |
| Airiness | 10000–20000 | 10 |
| Brilliance | 5000–10000 | 9 |
| Voice Intelligibility, Hearing Sensitivity Peak | 2500–5000 | 8 |
| Presence | 1250 – 2500 | 7 |
| Upper Midrange, Hearing Crossover Region | 640–1280 | 6 |
| Lower Midrange | 320–640 | 5 |
| Mudrange | 160–320 | 4 |
| Upper Bass | 80–160 | 3 |
| Deep Bass | 40–80 | 2 |
| Infrasound, FX | 20–40 | 1 |
Temporal Character
– Make Note of the Temporal Character, as Transient and Sustained can Co-Exist
– i.e. Since the Short On Falls Off After a Few Millisecond it is Actually Not that Important to Clean Up here, thus a Transient (Short Notes) vs Sustained (Long Notes) May be in the Same Spectrum Part
– e.g. the Lower Frequency a Sustained Sounds has the More it will Mask a Transient (a Sub at 60 will Devour a Kick at 120)
– this Makes a Huge Difference in Necessary Mixing Decisions as you can Save Time
Overview
– Basically 4 Steps are Needed
a) Prioritise Your Tracks (What Sound Characterises this Particular Song)
b) Start in Mono, Clean the Priority Sound with an EQ from the Main Clashing Instruments and Correct Dynamics
c) Send to a Minimum of 4 Meaningful Busses to EQ on the Bus Every Instrument
– Do that Solo Only within the Bus and in Context with the Bus Content Only
d) Feed Similar Instruments Further to a Dedicated Master Aux and EQ the Individual Master Aux In Context with the Rest of the Mix
Detailed Workflow
1) Do Not yet Think about How those Instruments will Fit Together at the End
2) Instead Prioritise the Tracks and Identify the Instruments that Got to Be Fighting with Each Other (Clashing Instruments)
3) When 2 are at the Same Spot, Decide which One to Feature and Boost it while Cutting the Competing Instrument at the Same Frequency Band
– you can Start to EQ a Sound on its Own, but it is More Important to Shape the Sounds in the Context than Make them Fabulous on their Own
4) Use Your Ear, Adjust EQ and Only Look at the Spectrum if Wondering What
5) Once a Instrument has Occupied a Frequency Band, Declare it More or Less as “Locked” for Other Instruments
– at Least Do Not Boost at the Same Area
– or Another Trick is to Put the Competitor in a Neighbour Octave that has Similar Qualities
6) Send Material to 4 Busses (or More) Regarding the Frequency Band Split Up
– means “General” Groups such as:
a) Drum/Percussion Group
b) Guitar Group
c) Pads/Piano/Keys Group
d) Backing Vox Group
7) Mix Individual Groups Out of Context with the Mix
– the Goal here is to Shape the Sound you Love with EQ´s
– i.e. EQ Each Instrument of the Sub Mix Group Soloed and In Context, but Only within the Group Itself for Now (Before Sending to a Master Aux)
8) When Done, Send All of these Similar Instruments to Their Own Master Aux and EQ the Master Aux In Context with the Rest of the Mix
– Quasi a Sub Group Mix (Parallel Bussing)
– or so to Say to Bus Groups to a Mini Bus
– you can Add Other Processing Tools as well
– Blend to Personal Taste
– i.e. EQ Each Master Aux Towards the Rest of the Mix
9) Done, Print
Leave a Reply