
General
– at the End of the 60ies “Stereo” was Introduced, i.e. Music was Heard through 2 Speakers and Forced the Engineers to Follow it
– e.g. Suddenly Engineers Started to Pan Things Hard Left and Hard Right which was Ok for a Stereo Equipment but Bad for Mono Equipment (e.g. you could be that you Just Hear Either a Drum or a Choir)
– in the 70ies Things Got Better as Engineers Developed better Techniques to Mix in Stereo, but Still the the Main Things were Done in Mono and then Finished in Stereo (Glue with Effects etc.)
– a Problem is as Soon as you Sum a Left and Right Channel into Mono, Some Sounds Get Louder while or Some Sounds are Suddenly Quieter while in Rare Cases an Instrument May Disappear Total
– the Fact is 50% of Listening Environments are in Mono, e.g. Tablets, Phones, Radio, Clubs (may be Stereo but the Stereo Perception is Not Clear), Even Live Concerts because Not All People are Exactly in the Middle for Best Experience Stereo Field, Similar as in a Car
– the Other 50% are using Traditional Stereo Equipment (Film, Stereo HiFi etc.)
– but it is Not Just About “Mono Compatibility”, Mixing in Mono Should be Understand as a Technique and Art that Helps you for Better Separation
– when Mixing, it is Better to have a Separate Mono Speaker than Summing the Project to Mono via a Mono Switch
– e.g. Avantones “Auratone” which is a Little Box, a Cube Speaker which Represents Kind of a Radio Speaker and can be Limited in Frequency Response (e.g. Not Below 200Hz and Not Above 5k or 6k)
– Think About the Challenge for Someone who Needs to Mix in Mono (Death in One Ear)
– they are use to Switch between Left & Right Monitor to get a Sense of the Contents Balance
– this can be used as a Technique to Start a Mix in Mono with just Working Out the Balances
– in Fact there’s a More Compelling Stereo Image if you Spread a Bunch of Mono Sources to the Left & Right instead Recording everything in Stereo
– so if you Prepare the Mixes Balance Great in Mono, it will be Huge in Stereo
– e.g. the Interplay of 2 Recorded Mono-Guitars, 1 Panned to Left and 1 Panned to Right gives you more Freedom than 1 Stereo Guitar (Counterpoint Mixing)
– in Traditional Pop Mixes Often Every Instruments has a Signal (Harmonics) between 400Hz and 2k
– also Drums are Better to Pan in Mono as you Better Hear where Overheads etc. Start Introduce Phase Issues
– EQ is the Tool to Separate Tracks from Each Other, then Compression and Gain Staging of the Individual Instruments
– the Crucial Part of Mixing in Mono is that you can be Sure that All of the Content is Heard, even when the Left and Right Signal are Collapsed to Mono Afterwards (Because “Masking” and “Phase Issues” are the Key Problem in Average Mixes)
– One of the Biggest Benefits when Mixing (Listening) through One Speaker is that “Muddy Sounds” Really Come through , which Not Necessarily Heard in Stereo as the Ears Could Falsely Represent the Mud as the “Body” of a Sound (which Might Not be True)
– another Fact when Mixing in Mono is, that No Matter Where you are in a Room the Perception of the Sound Stays, in Contra you Lose the Stereo Illusion when you Move your Head Away from a Stereo Speaker System (Not so with a Single Speaker)
– also the Brain Perceives the Job as More Manageable with 1 Simple Box and Solutions can Be Revealed Much Easier
Note On Stereo Effects
– Reverb and Stereo Effects can be Tricky when you are Trying to Find a Perfect Balance in Both, Mono and Stereo
– Almost All Reverbs will Sound Drier in Mono Compared to Stereo
– i.e. a Good Sense on Space or Perspective in Mono will Often be Too Wet in Stereo
– Viceversa you get the Reverb Right in Stereo, it will be Too Dry in Mono
– thus a Good Compromise is Required, but you can also Try to Narrow the Reverb Width to Make the Difference Less Obvious
– some Engineers Even Pan Mono Reverbs with Each Individual Instrument to Maintain a Better Stereo-Mono Balance (a lot of Extra Work as you Need to Create for Each Instrument an Individual Linked Reverb to be able to Pan it on its Own)
Note on Spectral Mixing
– it can be useful to Combine the Mono Mixing Technical Aspects along with the Spectral Mixing Management
– Basically 4 Steps are Needed
a) Priorities Your Tracks (What Sound Characterizes this Particular Song)
b) Start in Mono, Clean the Priority Sound with an EQ from the Main Clashing Instruments and Correct Dynamics
c) Send to a Minimum of 4 Meaningful Busses to EQ on the Bus Every Instrument
– Do that Solo Only within the Bus and in Context with the Bus Content Only
d) Feed Similar Instruments Further to a Dedicated Master Aux and EQ the Individual Master Aux In Context with the Rest of the Mix
– the Detailed Workflow Includes the Parallel Spectral Mixing Steps for the Full Experience
Note on Temporal Character
– Make Note of the Temporal Character, as Transient and Sustained can Co-Exist
– i.e. a Transient (Short Notes) vs Sustained (Long Notes) May be in the Same Spectrum Part, but Since the Short On Falls Off after a Few Milliseconds it is Actually Not that Important to Clean Up here
– e.g. the Lower Frequency a Sustained Sounds has the More it will Mask a Transient (a Sub at 60 will Devour a Kick at 120)
– this Makes a Huge Difference in Necessary Mixing Decisions as you can Save Time
Workflow Overview
– this Example Does “Panning After EQ”
– Some Engineers Do Panning but Before EQ, i.e. Panning Right After Gain Staging
– Notice that Some Engineers Even Pan in Mono to Find the Sweet Spot, i.e. just Pan a Little and Suddenly a Clear Spot will Pop Out
– Either Way, the Key is to Do at Least EQ and Dynamics in Mono until you have a “Great Separation”
– it is also Helpful to Start Shaping the Reverb Effects On 1 Speaker, Before Going Stereo again
– in General, Critical Decisions are Good to be Judged in Mono First (e.g. Things that Jump Out, Too Low Stereo Pads or Mud is Far Better Heard)
– Periodically Switch between Mono and Stereo at Fixed Mixing Steps
Typical Chain
(Mono) Gain Staging —> EQ —> Dynamics —> (Stereo) LCR Panning —> (Mono) Check Gain, EQ & LCR Panning (Stereo) Binaural Effects —> Modulation Effects —> (Mono) Check Binaural & Modulation Effects —> Reverb Effects —>(Stereo) Check Reverb Effects —>Print
1) in Mono
Gain Staging —> EQ —> Dynamics
2) in Stereo
LCR Panning
3) in Mono
Fine Adjust Gain Balance, EQ and LCR Panning in Mono
4) in Stereo
Binaural Effects / Modulation Effects
5) in Mono
Fine Adjust Binaural Effects & Modulation Effects in Mono —>Add Reverb Effects
6) in Stereo
Final Check Overall Reverb Effects and Direct / Wet / Positions in Stereo
Print Mix in Stereo
Detailed Workflow
1) Mono Gain Stage / EQ / Dynamics (Mono)
– Set Master Output to Mono or Even Better Work with a Configured Mono Speaker
– Gain Staging —> Equalization —> Dynamics
Gain Staging
– All Sounds are Balanced to the Center and the Faders are at Unit Gain (LM Correct)
1) First Get the Volume Balances Working (No Panning)
2) Automate Level or Separate Tracks when Needed
3) When Adjusting Gain Over Time, Think About Doing It Pre Fader so Processing Effects Benefit from that Consistent Input Level
– Best is to use a Plugin Such as Dualism with a Trimmer and a All Necessary M/S Tools
Equaliser
– Do Not yet Think about How All Instruments will Fit Together at the End
– Instead Priorities the Tracks and Identify the Instruments that Got to Be Fighting with Each Other (Clashing Instruments)
– Although it is Good to Shape a Sound on its Own, it is More Important to Shape the Sounds in the Context than Make them Fabulous on their Own (Complimentary EQ)
– i.e. Always Make Final Decisions when Listening All Together
– Think About the Whole Range of the Spectrum from 20Hz to 20kHz
– Slice the Spectral Range Up in a Way that Each Individual Instrument is Gonna Occupy Mostly Just One of those Frequency Bands
– you Must Detect the Competing Instruments and Decide which One to Compromise or which One to Feature
– use the 10 Octaves we Hear
– Almost All Sounds Contain Energy in at Least Six of this Octaves
– Octave 1 has Almost No Useful Information, but Still Dramatic, Fun and Important to Play with
– Octaves 2 to 3 Provide Critical Bass Energy and Need Great Care, Attention and Aesthetic Nourishment (Tender and Touchy)
– Octaves 7 to 10 are Almost Exclusively Overtones
| ATTRIBUTES | FREQUENCY RANGE HZ | OCTAVE |
| Airiness | 10000–20000 | 10 |
| Brilliance | 5000–10000 | 9 |
| Voice Intelligibility, Hearing Sensitivity Peak | 2500–5000 | 8 |
| Presence | 1250 – 2500 | 7 |
| Upper Midrange, Hearing Crossover Region | 640–1280 | 6 |
| Lower Midrange | 320–640 | 5 |
| Mudrange | 160–320 | 4 |
| Upper Bass | 80–160 | 3 |
| Deep Bass | 40–80 | 2 |
| Infrasound, FX | 20–40 | 1 |
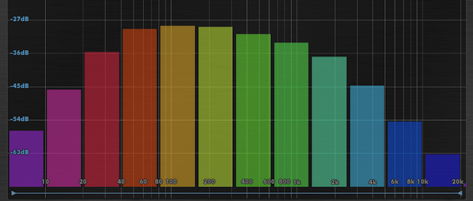
1) While Everything is Playing, First Start to Cut those Elements in the Mix with a EQ that are Obtrusive, Too Much Over the Top
– Basically you Want to First Do Subtractive Equalization to Clean Up but also Enhance any Characteristic Elements with Additive EQ
– Do Approximately Cuts and Boost of 3dB to 6dB at the Right Frequency Spot (Not Extreme Settings in the First Place)
2) Separate Frequencies so the Focus is on the Main Character of Every Sound, i.e. EQ Sounds that are Taking Away Something Else in the Mix
– i.e. Distinguish Similar Instruments with Complimentary EQ (Counterpoint Aspect)
– When 2 are at the Same Spot, Decide which One to Feature and Boost it while Cutting the Competing Instrument at the Same Frequency Band
– Do Not Boost at the Same Area, Instead Put the Competitor in a Neighbor Octave that has Similar Qualities
3) Apply HP to Elements that are Not Musically Relevant in the Bass
4) Apply LP to Elements that are Not Musically Relevant in the Tops
5) Once a Instrument has Occupied a Frequency Band, Declare it More or Less as “Locked” for Other Instruments
Dynamics
– Feel what Looses Energy Over Time
– Shape Elements with Compression
– Shape Transients with Transient Designer
– use Expansion to Increase Dynamic Range
– After Compression, Re-Adjust the Level & EQ a bit(Since Compression Often Brings Out Other Details you Miss)
– when Adjusting Gain Over Time, Think About Doing It Pre Fader so
2) LCR / Standard Panning (Stereo)
– Once you Think that the Sounds have a Unique Place i.e. you can Distinguish What is What, Continue with Standard Panning
– Set Back the Master Output Back to Stereo
– you Should have Real Fun Panning Things Now in to Stereo when the Gain Stage, EQ and Dynamics are Well Done in Mono
LCR / Standard Panning
1) Check your Elements and Prepare yourself on what to Divide to the Left and Right
2) Limit yourself and use the LCR Panning (i.e. Either Hard Left, Hard Right or Centered)
– Some Do Not Hard Pan a Mono Signal to 100% as it Falls Out of the Stereo Field
– a Good Range is from 60 to 85 but Maximal 90% which Still will Widen Up the Image of 2 Signals
– another Thing is if you Hard Pan 2 Similar Guitar Recordings (Double Parts) or True Stereo Recordings, these Already have Slight Phase + Time Differences and Panning those Hard Left/Right Works Good Plus Leaves Space in the Middle for other Parts
3) it is Not Common to Pan a Static Signal to the Left and a Constant Moving Signal to the Right
– Rather you Pan 2 Similar Moving Sources Away from Each other and Viceversa 2 Similar Static Source away from Each other
4) Notice that an Alternate Way of Panning that is More Creatively are Panning Effects such as Delay Spreading, Flip Phase or Binaural Techniques, which can be Done Before Panning or Afterwards
3) Double Check LCR Panning (Mono)
– i.e. Fine Adjust LCR Panning in Mono
4) Binaural Effects (Stereo) Delay Effects / Binaural Effects / Modulation Effects
– Haas Delay Spreading, Flip Phase or Special Spatial Plugins for More “Binaural Effects” (Alternatively to Standard L & R Positions)
– the Benefit of “Haas Delay Effects” is that their Energy Stays Centered, thus Not Really Panned to One Side while Still Giving the Illusion of a Pseudo Stereo Effect
– the Benefit of “Flip Phase Effects” is that you can Create “Strange Places” that an Instrument or Sound can be Placed at
– the Benefit of “Special Spatial Plugins” is also to Play with the Illusion of Objects Appearing where Nothing Else is
– Start to Create Aux Returns for Delay Effects & Flip Phase Effects & Special Spatial Plugins
1) Haas Delay Spreading
– Mono to Stereo Delay Trick to Provide an Alternate Way to Pan Things
– on a Mono Signal, Setup a Haas Effect on One Channel with a 1ms Delay (No Feedback and Only the Delayed Channel is Wet)
– Gives the Impression the Signal Comes from Respective Side Earlier, i.e. Before the 1ms Delayed Sound Kicks In
– the Haas Effect Does Not to be 1ms though, Check the Phase and Search Sweet Spot for Less Negative Comb Filtering Effect

2) Aux Return Flip Phase
– on a Aux Return, Flip the Phase on Either Left or Right Channel (use a Plugin such as Dualism)
– this Way the Signal Energy Stays in the Middle but Still Gives the Illusion of a Pseudo-Stereo Effect
– to Find a Special Place for your Instrument, Simply Pan the Aux Return Around
Other than Middle, you Create the Effect of an Object is Sitting “More Around & Behind you” than Left to Right Straight in your Face
– i.e. the Energy is Weaker than Standard Panning Left & Right which Makes the Signal Comes from More Far Away
3) Binaural Plugins
– use such Plugins as an Alternate Way to Place Things in 3D
– Find a Sweet Spot for Sounds that Still Do Not have their Own Place in the Mix
4) Modulation Plugins
– use Modulation Effects for Movement of Signals
5) Reverb Effects (Mono)
Reverb Plugins
– use Time Based Spreading like Reverbs
– use Room, Depth and Width Setup
– use Reverb in Mono as you Better Hear Mud or Wholes in the Mix
6) Final Check Effects (Stereo)
– Fine Adjust Everything, i.e. Overall Reverb, Dry / Wet, Position
– Continue with the Spectral Management Technique
7) Send Similar Material Busses (Sub Groups)
– e.g. “General” Groups such as:
a) Drum/Percussion Group
b) Guitar Group
c) Pads/Piano/Keys Group
d) Backing Vox Group
8) Mix Individual Groups Out of Context with the Mix
– the Goal here is to Shape the Sound you Love with EQ´s
– i.e. EQ Each Instrument of the Sub Mix Group Soloed and In Context, but Only within the Group Itself for Now (Before Sending to a Master Aux)
9) Send All of these Similar Instruments to Their Own Master Aux (Stem Master if any)
– EQ the Master Aux In Context with the Rest of the Mix
– Quasi a Sub Group Mix (Parallel Bussing)
– or so to Say to Bus Groups to a Mini Bus
– you can Add Other Processing Tools as well
– Blend to Personal Taste
– i.e. EQ Each Master Aux Towards the Rest of the Mix
Leave a Reply