
General
– in EDM, the Loudest Peak Should Always be in the Low Frequency at Around 50Hz to 60Hz, i.e. to Balance the Volume Against the Mid Range / High Range (when Mastered this Low Peak Dances Around -5 to -10 dBFS)
– to Enhance a EDM Kick you can Use a Multiband Saturator and then Only Saturate the Mid Range of the Kick
– the Sub Bass Sits by Nature at the Lowest Spot Possible, but Even Modern Club-Sound Systems Do Rarely Go Below 30 Hz (or Not Even to 40 Hz)
– so Keep this in Mind and Use Keys / Frequencies which Benefit the Most from Putting the Sub to (that is Why EDM in the Key of C to D# are Less Chosen Unless you to Put Another Note in the Sub than the Fundamental of those Keys)
– Start with Kick and Bass and Core Drums to Build Solid Foundation
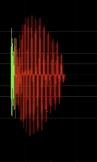
– Look that the Transient of the Kick is Not Drastic Louder than the Sustain of the Kick, i.e. the Initial Kick Transient Should be Equal Loud or Quieter than the Sustain of the Kick, Check via an Oscilloscope
– Get the Right Sounds, Audition in Context to the Track Playing, i.e. Not Just Pick the Best Hi Hat but the Right Hi Hat for a Particular Track
– Do Not Compress or EQ for Every Track, Better Switch the Sound
– Volume Balance is the Most Important
– Less is More, i.e. a Track with Less Tracks is Easier to Mix, but this Requires Every Elements to be Strong and Well Produced
– Just Adding a Top Loop More can Kill the Track and / or Make Mixing a Nightmare
– Always Check Basslines Along Motif and Be Sure that They Not Fight Each Other in Attention but Rather Compliment Each Other
– Try to Make a Call and Response on Any Element, i.e. Even Hi Hat Loop Should Somehow have a Call and Response Pattern to Keep the Flow and Being Organic
– A Good Trick to Find the Sweet Spot in Volume is by Bringing a Element from Zero Up to Best Point and Notice that Value, then Do the Opposite from Loud Down to Best Point and Notice that Value, Finally Take the Average of Both Values, i.e. if you Start from Inaudible to Loud you Perceive as Being Louder and Viceversa Bringing Something Down in Volume you Perceive it as Quieter
Make it More Analog / Alive
– Drums = Add Vinyl Loops to the Production, e.g. Samples / Vinyl Drum Loops / Cracks / Noise / Vocoder (e.g. to 16ths Hats) and then Modulate Vocoder Release and Dry / Wet Both with 2 Different LFOs and Each with a Different LFO Time for More Variation (Against Loop)
– Software Synths = Add Randomness, e.g. in Diva Add a 2nd OSC with the Same OSC Type but Detune it a Bit (Static or Use LFO 2 to Modulate Tune Mod), or Add Noise, Velocity Randomness, Layer with White Noise and Again Detune a Bit to Spread the Sound
– Add a Jittering / Random Reverb
– Move Single Events by 1/16 Back or Forth to Get Away with Static Loops, e.g. Off Stab Chord Not Every Single Time at the Same Spot but e.g. Move 2nd Stab Chord 1/16 Ahead
– Automate / Autofilter / Modulate Things, e.g. Assign Cubase Modulators to Synth Parameters
EDM Mix Workflow
– Mix in Order of Importance, First the Part that Rocks the Crowd and then the Part that Makes it Memorable (at Least in EDM)
– in EDM Order of Importance is Kick -> Bass -> Main Hat -> Add Hat + Percussion ->
1) Kick and Bass See “Compare and Match to Reference via HP”
– Basically Start so Kick Averages Around -10 and Peaks at -4dBFS and Bass is 4dB Lower than Kick (and Kick + Bass Together Still Not Peak More than -4dBFS)
2) After Kick and Bass Add Main Core Drum Elements Such as Claps / Snares
– Clip Individual Claps About 2dB and then Clap Group About 2dB
– Look that Clap and Kick Not Peak More than -2dBFS (while Kick Alone Peaks at -4dBFS)
– Don’t Make the Clap / Snare Jump Out of Speakers, Just Give it Enough Impact
3) Add Main Hat Loop and EDM Open Hat
– Pan Main Hat Loop 9R and Clip it a Bit
– Pull Some Attack of Open Hat Away (Either Offset in Sampler or Transient Designer), Clip it a Bit, Pan Main Open Hat Somewhere Opposite (L9)
4) Add Conga / Bongo
– Do the Trick with Bringing Conga / Bongo from Zero Up to Best Point and Notice that Value, then Do the Opposite with Bringing Conga / Bongo from Loud Down to Best Point and Notice that Value, Finally Take the Average of Both Values
– Clip it a Bit
5) Add Other Hi Hat Elements or Hi Hat Loops
– Same Process but Lower Them in Volume / Hierarchy
– also here Try the Zero Up / Loud Down Trick
6) Trim the Entire Hat Group so it Does Not Peak Above -5dFS to -6dBFS, also Try Make the 10kHz Spot of the Final Hi Hat Group Sits Around -55dB to -50dB (After Compression)
7) Now Start with Mixing Group Based, Start with Kick and Bass, i.e. Nothing Else but Kick and Bass is in this Group
– Add Tape (e.g. Slate)
– then a Summing Sat / Glue Tool ( e.g. Slate Virtual Mix Rack)
8) Now Drum Buss, i.e. Nothing Else but All Drum Elements is in this Group (Kick / Clap / Snare Hats / Bongos etc.)
– -3dB GR Compression (1176)
– then -10dB GR but Parallel Compression
– then a Saturator, e.g. Triode Culture Vulture in Parallel
– then Ozone Imager, Mono Below 250Hz, Mono Above 10kHz and Rest Widening a Bit
– then See if a Clipper is Needed bit Only when Harsh Transients are Occurring
– then a Summing Sat / Glue Tool ( e.g. Slate Virtual Mix Rack)
– then Add Reverb to the Entire Drum Buss, Duck the Reverb Through the Drum Buss (Send About -25), EQ Out the Lows, Try for Dynamic and Spaciness
9) Add the Most Important Vocals so They Sit in the Front
– Do Some Basic Adjustments if Needed, i.e. Masking Problems we Solve Later
– also here Try the Zero Up / Loud Down Volume Trick
10) Add the Most Important Instrument(s) so They Sit in the Front, e.g. Pluck or Chord
– Do Some Basic Adjustments if Needed, i.e. Masking Problems we Solve Later
– also here Try the Zero Up / Loud Down Volume Trick
– in the Case the Instrument(s) Block the Vocals, Pan One Instrument L12 and the Other R12
– Another Trick Would be to Automate the Pan between L12 and R12 on Each Important Instrument, i.e. when One Plays L12 the Other Plays R12 and They Alternate the Panning Position
11) Add the Pads
– Do Some Basic Adjustments if Needed, i.e. Masking Problems we Solve Later
– also here Try the Zero Up / Loud Down Volume Trick
12) Add FX with Same Principles
13) Now it is About to Check the Overall Balance of the Mix
a) Add a Limiter and Push to Around -9 / -8 LUFS, i.e. in the Ballpark of Similar Tacks in that Genre
b) Then First Compare the Level of the Hats to References via a Frequency Analyser, i.e. Set Analyser to Hold, Play Similar Sections and Check Both Songs Frequency Spectrum for Obvious Differences, then Adjust the Differences to Match Reference Where Needed
c) Play Back Song and Add Each Group One After the Other, i.e. Play Kick and Bass -> Add Drums -> Add Synths -> Add Vocals -> FX, this is to Check the Masking and How the Groups Compliment Each Other
Mix on Headphones Tips
– Sennheiser HD650 or Aiaia TMA Wireless Plus or DT 880 Pro
– Use the Same Headphones for a Long Time
– Keep the Volume Low and Make Regular Breaks
– Referencing Other Stuff on the Same Headphones
– Take the HP Mix Out and Listen in Other Environments (Phone / Earbuds / Car / Club)
Compare and Match to Reference via HP
– i.e. Measure Loudness of the Reference Kick (e.g. -9dB), there can be Hats Playing as the Kicks Peak is Louder Anyway
– Do the Same for the Bass to Know the Relative Volume of Bass vs Kick by Measure Loudness of the Reference Bass (e.g. -14dB), Either Take Where Bass is Playing Alone or Use the Off Bass Note Where the Kick is Not Playing
2) Now Set the Kick and Bass to be 5dB Different in Volume (-14dB = Bass vs -9dB = Kick)
– i.e. First Use a Gain Plugin or Track Volume Fader to Set Kick Loudness Close to Zero but with a Headroom of 7dB (this will be Later Adjusted with Limiter to Zero dBFS), also Make Sure the Kick Peaks at Maximal -3dB- to 4dB
– Now Set Volume for the Bass and Look so it Peaks at -8dB- to 9dB (i.e. Match the 5dB Difference in Volume Against Kick -3dB- to 4dB)
3) Check Oscilloscope to See How the Kicks and Bass Interact
4) Now Bring In All the Other Elements and Match the Overall Reference Loudness of -8.5 LUFS by Using a Limiter on Your Track
5) Check Spectrum Analyzer to Compare Spectrum of Reference vs Your Track
– e.g. Check if the Hi Hats / Vocal / Melodic Elements are Too Different and Use the Same Trick to Compare and Adjust Loudness of Hi Hats / Vocal / Melodic Elements of Reference vs Your Track
– Fine Tune by Raise or Lower Fader Level of Single Tracks or Groups to Match Spectrum, also Adjust Limiter when Making Changes
Deep House Tricks
– Reduced in Everything but Voluminous
– Especially Deep House and Tech House Consist of a Clean Cut Sound on Each Sample
– Resample your Own Track to Where the Mix Sits Very Harmonically with the Sound you Use
– Tempo = 100 – 127, but Typically 100 to 125
– Kick Filter (Ableton Auto Filter in MS20 Mode) for Intro / Breaks is Around 100Hz with a Slight Resonant Boost and a Little MS20 Drive
– Try Octave Basslines, i.e. Switch between Low Bass and 1 Octave Higher
– MPC Swing on Hats
– Add Random Velocity of +/-10 on Hats
Kick and Bass (Fundamental)
– Must Join Each Other to Carry Everything Else and be In Tune to Each Other, i.e. have a Harmonic Relationship
– but Forget About the Necessity to have the Kick Tuned to the Same Fundamental Note, it can Cause Phase Issues with the Bass that also Plays at the Same Frequency Spot and it Sounds More Boring when Fundamental Comes Every Beat, i.e. Better Use a Kick that is Tuned 2 Semitones Lower than the Bass (e.g. Bass in G = Fundamental but Kick in F, or Song is in Dm and Kick in G), or if the Key is Am then Set the Kick to be an E (i.e. E to A = a 5th) so there is Space for Both
– Both Need Enough Space to Evolve and Change in Tonality / Rhythmically
– the More Voluminous a Sound is the More Space it Needs
– Remember that Kick and Bass May be at Separate Spots but Still “Merged” which Gives you Less Trouble in Volume Distribution
Snare / Clap (Backbeat)
– can be Something Other Such as a Chord Sound
– or Play with Evolving Hi Hats Joined with Field Percussion / Samples and Play with Hall / FX,
– this Way the Hi Hat can Increase Tension (which is Difficult with Snare/Clap)
– Cut the Claps Low Frequencies to Leave Room for Low Mids
– but Do Not Cut the Hi Hats “Low Frequencies” Too Much as it Sounds Very Thin and the You Need to Layer Stuff which can Get to a Mess
Syncopation (In-Between)
– Fill with Tuned Elements and Tuned Percussion
– Goal is to Bind Rhythmic Components
– Harmonic Components and Melodic Components
– as Well as Bind Fundamental and Backbeat
– also Since the Kick and Bass have a Harmonic Relationship you Need to Extend on them (Instead Adding and Adding Sounds)
– Another Way to Apply Syncopation are Sample Loops which you can Cut / Trim to your Hearts Content
FX / Delay
– Delays can be Excellent to Bring Life
– but Do Not Sync 100%
– Try Short Slapback Echoes (Not Necessarily Long Dub Echoes)
– Search for the Place Where it Pushes Forward
– but Avoid Not Too Much Delay and Again Use Echo Effects
Arpeggio
– a 16th Groove can Add Drive
– Try Tonal Sounds that Harmonize with the Content, or Alternatively Use Ticks and Click (RX)
Arrange
– Stay “DJ Compatible” and Keep the Flow
– Make Loops of your Own Material to Extract the Essence
– if you can Play the Arrange in a Club and Arrange it Even there
– when Shortening Arrange Time for the Radio Be Sure that the Elements Remain Immediately Catch You
Mix Tips
– Remove Clutter and Keep the Low End Tight
– Below 200 Hz Nothing but Kick and Sub
– Add a Multi Band Plugin to the Master or Kick + Bass Buss Only to Solo Listen the Low Band and Better Hear the Balance
– Use the Same Low End Solo Listen Technique to Check Commercial Tracks (if they Used Heavy Ducking or they Set the Rhythm in a Way so they Do Not Clash or if they Precisely EQ the Stiff Down there
– Good Sidechaining, Gain Staging, EQ for Kick + Bass Balance
– Saturate the Clap so the Peak is Smaller but the Clap Sounds Louder in Order to Not Trigger the Limiter with the Clap Too Much
– Clap has a Reverb with a Pre Delay of Around 30ms and a Decay with 770ms
– Listen the Track at Loud Volume, i.e. Compare to Other Tracks of Your Genre at a Certain Level
– Never Mix from Scratch into a Limiter, it will Ruin the Track and Kill Dynamics, but of – course Towards the End Check with Limiter to Hear How it will Sound Once Limited
– Suggested to Listen Using a Loudness Meter at 9 LUFS
Sidechain
– Not Obvious and Pumpy
– Just Get the Bass Out of the Way for the Kick and Be Back in the Mix with Presence as Fast as Possible (Without Obvious Pumping to the Volume Returning)
– Very Short SC Attack on Bass Causes Clicks and Pops
SC Workflow
1) Get Kick Level, EQ and Otherwise Processed First
2) Add Bass Track and Mix it to the Kick
3) SC Attack = 10-20ms for the Bass, SC Attack = 0ms for Melody / Vocal etc., you Want the Initial Bass Attack Add to the Kick Attack but then Back Off to Let the Kicks Body Through
4) Release = Depends on How Long the Kick is, Typically Start at 40ms and Turn Up Until the Whole Kick is Coming Though
5) Ratio = Start with 4dB to 6dB and Tweak, Ratio Works in Conjunction with Release for the Optimal Settings
Using Reference Tracks
1) Use 2 or Mastered Reference Tracks in the Same Style and be Sure They are Not Routed to the Master Bus with the Limiter On or has Any Additional Processing (Since They are Already Mastered)
– Either Use ADPTR or then Route the Track Directly to the Main Out
2) Play the References Loudest Part and Measure the Loudness of the Reference Tracks and Adjust Yours with a Simple Gain Plugin
– Suggested Listen Using a Loudness Meter at 9 LUFS
– i.e. this is Only to Compare Yours vs Reference at the Same Perceived Loudness
– Ideally Align the Reference Arrangement so e.g. you can Measure / Compare the Energy Coming Out of the Breakdown (i.e. Main Drop) between Yours vs Reference
– and then also Compare a Part Where Less is Going On so you have the Relative Levels of the Louder vs Quieter Parts
3) Use an Analyzer and Sidechain the Reference so you can Compare / Overlay the Frequency Spectrum between Yours vs Reference
– Set to 8192 Block Size with 1/3 Smoothing and Try Average Read Out Instead Real Time
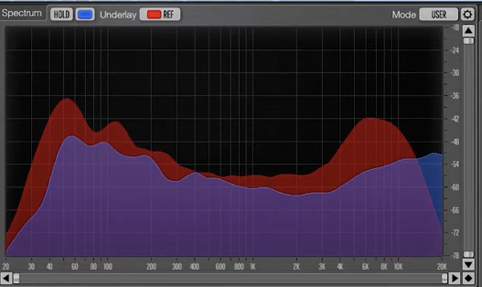
4) Before Doing Anything, Fine Adjust with a Simple Gain Plugin the Reference (or Adjust the Reference SC Gain in the Vst3 SC) so the Kicks are at the Very Same Level (i.e. Kick of Reference vs Yours)
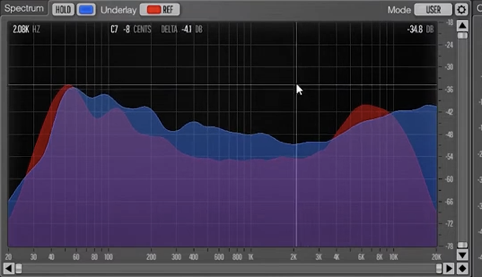
5) Based on Above Comparison Curve, Start to Match Yours to the Reference with EQ etc.
– e.g. Reduce the Hi Hat Highest Portion but Increase the Body of the Hi Hat
– e.g. Bring Down the Bassline Either Ideally with Track Fader Inside Mixdown Session or when Already Mixed Down with an EQ at that Frequency
6) Also Compare the Different Channels as Well, i.e. Mid / Side / L / R
7) Also have a Copy of the Latest Rough Mix of Your Track Inside the Session to Compare if the Adjustments are of Positive Progress
Compression
– Compression Mainly on Vocals
– Occasionally on Other Instruments Very Gently, e.g. on Synth a Glue Compressor with Attack of 3 / Release of 2 / Ratio of 4 with About 2dB to 3dB GR
– Transient Shaper for Top Loops or Other Spiky Stuff, e.g. Reduce Transient but Boost Sustain
– Uses Limiter on Main Mix to Get Closer to Professional Mixes (2-3 dB GR) and Sometimes on Vocals
Leave a Reply