
General
- be Sure that you Listen / Mix / Master at a Certain Level or the Master will have to Much Bass and / or Harsh High-Ends
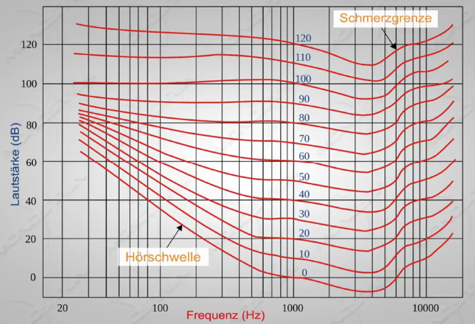
- According to the Fletcher Munson Curve the Ears Work Preciser and Linear when you Increase the Level
- i.e. About 83dB to 85dB is Recommended
- Make a Break for 5 Minutes at an Interval of Every 55 Minutes (to Neutralize the Ears)
- Do Not Use Specific Tools for Everything, Instead Several Tools with Just a Little Influence
- Also Consider the Simple Facts that Reducing Low End will Bump the High-End, or Compressing High-End will Bring the Snare to the Foreground etc.
- Be Sure to Know What you Want to Do to the Sound During Mastering in Order to Keep a Certain Processing Order
- Remember that Boomy Basses and Nasty Highs will Make the Compressor Work Too Hard
Workflow Preview
Clean Up
1) Remove Resonances with Dynamic and / or Static EQs
2) Balance Dynamic with Multi-Band Compressors
3) De-Ess and HF Limiter
4) Check Bass Mono Compatibility
5) Reduce on Demand the Bass and / or Highs with a Lo-Shelf / Hi-Shelf, or an EQ with a Broad Q
6) Use the Limiter from the Start on to Make Sure the Overall Picture Remains After Doing EQ / Coloration etc.
- i.e. if you Put the Limiter After All the Master Steps the Picture Changes Totally
- Notice that the Limiter Still is the Last Plugin in the Chain, but you Activate it from the Very Beginning
Focus Sound
1) After the Clean-Up, you Determine the Sonic Aspects the Sound Needs and the Power
- if you can, Use Hardware EQ and Compressors for that
2) Fine-Tune Behaviour of Transients
3) Fine-Tune Frequency Picture
4) Fine-Tune Presence
5) Fine-Tune High End and Low End
Polish Sound
1) Correct Loudness
2) Correct Stereo Picture
3) Correct M/S
4) Insert Tape and Saturation
5) Insert Specific Tools Such as De-Edger or Harshness Controllers
Final Control
1) Control Peaks and Set Final Loudness
2) Render / Listen Track and Check for Artefacts
3) Save Master Rig for Total Recall (and Make a Photo of Hardware Equipment Settings)
4) Go to Wavelab and Check Intersample Peaks
5) Set Fade In / Out
Setup
- if you Use Hardware, you Would Route the Digital Signal from Cubase via a Digital to Analog Converter into the Hardware and then the Analog Signal via a Analog to Digital Converter Back into Cubase
- if you Use Stem Mastering, Use Groups Inside Cubase
- Use Cubase to Master the Track as it is Most Flexible in Terms of Routing etc.
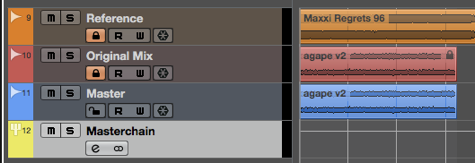
1) Create 3 Stereo Tracks
a) Reference Track, i.e. Either a 3rd Reference Track or if you Master an Album you can also the Best Sounding Mastered Track of the Album as the Reference
b) Original Mix to be Able to Compare the Master Against the Actual Master vs Original Mix at Any Time
c) Actual Master Track where Master Plugins Go
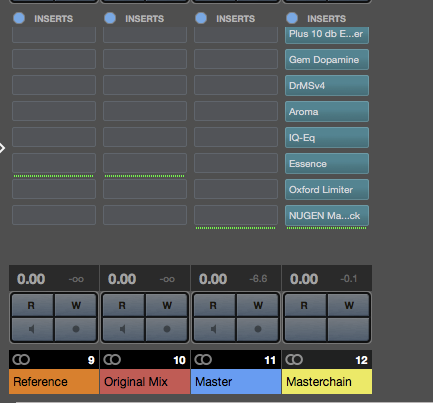
2) Insert Mastercheck as the Very Last Instance for Real Time Analysis of Loudness and Compensated Levels
- i.e. Insert Mastercheck Send on the Reference and Original, and the Definitive Mastercheck Instance on the Actual Master Chain as the Very Last Instance (After Limiter etc.)
Detailed Workflow
- as Always, First Listen and Go Step by Step
Clean Up
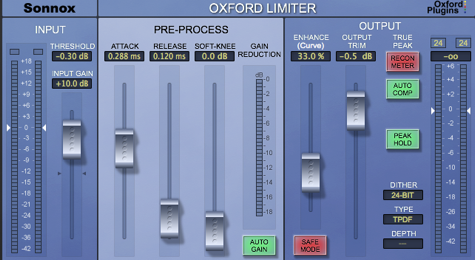
1) First Set Initial Loudness of the to Be Mastered Track via the Limiter to Preserve a 6dB of Headroom for the Actual Mastering Enhancements
- i.e. Adjust Actual Mix via the Limiter Output Trim so it Does Not Exceed -6dBFS on Peaks (if Necessary, Re-Bounce a Quieter Version)
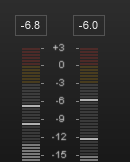
- Remember that the Limiter is On from the Very Start, but During Clean Up there Should No Actual Limiting Going On Yet (Only Safe Headroom and Output Trim)
2) Use a Dynamic EQ to Control Ever-Changing Hi-Hat (BX Dyn EQ)
- i.e. at Around 7000Hz there is Often a Place the Hats have a Too Prominent Ringing (Rather Narrow Q)
3) Control the Low End with a Multiband Compressor (UAD Precision MB)
- Divide into 2 Bands, 1 for Sub-Bass (0 – 75) and 1 for High-Bass (75 to 246)
- Approx Ratio of 4:1, Slow Attack and Slow Release
4) Use Mastercheck to Regularly Compare Against Original Mix
5) Now the Mids and Highs are More Prominent which may be Too Nasal
- Use a “De-Esser” (or Dynamic EQ / MB) to Dynamically Control the Increased Snare Mids Presence (Sonnox Suppressor HR)
- Frequency Range About 990Hz to 2kHz, Use the Wet/Dry Mix to then Balance the Effect the Parallel Way
6) Tame Boomy Basses and Nasty Highs to Avoid the Compressor Working Too Hard
- if you can, Reduce them Before Compression with a Digital EQ and Boost After Compression with a Hardware EQ
- i.e. Use a Digital Low Shelf at 166 Hz with About -0.5dB Attenuation, and a Digital High Shelf at 7100Hz with About -1dB Attenuation (UAD Bax EQ)
7) Check for Low Bass Resonances with a Super Clean EQ (Massenburg, Epure or IQ EQ)
- i.e. Check from 50 to 100 Hz
8) Use Mastercheck to Regularly Compare Against Original Mix
9) Now it is Time to Drive into the Limiter to Match the Desired Integrated LUFS
- Increase Gain of Limiter so you Get About -12 to -13 LUFS and a Peak Headroom of a Least -0.3 dBFS
- Rather Slow Attack and Release, i.e. so the Bass Comes Through Naturally
- i.e. See Actual Integrated LUFS in Mastercheck and Increase the Limiter Gain by the Difference to the Target
– e.g. is Actual LUFS is -18 and you Want -12, Simply Add 6dB of Gain in the Limiter (Gain Reduction Does Not Matter here)
- Oxford Limiter has a Transparent Low End Response and is Good for EDM
- if a you Want More Gain Reduction, you can Use the Sonnox Limiter “Threshold” Slider which Adds to the Pre-Process
Focus Sound
- Now it is the Time to Route to the Hardware via Dangerous Liaison Converter
- Add Impact and Emotional Response to the Track
1) Add a Clean and Transparent Compressor First (Portico II Master Buss Processor)
- First Increase Bass in Mid Signal (M/S)
- Second Increase the High Mid in the Side Signal (M/S)
- Route this M/S Adjustments into the Compressor in RMS Mode and Feedback Compression Style
- Ratio of Maximal 2:1
2) Colored Compressor First (Manley Variable MU)
- a Compressor with Tolerances between L+R which Add Warmth, Depth and Body
- also here, Slow Attack About 70ms and a Short Release of About 200ms
3) EQ with a Fast Response that can Handle Fast Voltage Changes (Great River EQ MAQ 2NV)
- Should be a EQ with a Fast Response, Punchy and May Color the Transients
- Enhance the 150Hz Range with a Broad Q Bell Curve About 1dB
- Enhance Low Mid in the 350Hz Range with a Broad Q Bell About 0.7dB
- Enhance Presence in the 3700Hz Range with a Standard Q Bell About 0.7dB
4) Insert a Slow EQ and Enhance the 1kHz About 1dB to Add Impact to Vocals (API 5500)
- also Add 1dB or 2dB to the 200Hz Mark for More Meat
5) Insert a Hi-Shelf EQ from 800Hz On for Focus (Kush Clariphonic)
- also Add Until 39000 Hz with Clarity, this Emphasises also the Hearable Range, Gives Brilliance and Opens Up the Whole Track
6) Drive the Whole (Hardware) Chain into a Pultec Style EQ and Compressor (Tegeler Creme) but in Parallel Mode
- Add 1dB of Low Boost at 30Hz
- Add 2dB of High Boost at 24kHz
- Use Comp with Fastest Attack, Slow Release (0.3) and Maximum Ratio 10:1
- Increase Parallel Knob to About 1/3
7) Use Mastercheck to Regularly Compare Against Original Mix
Polish
1) Use a Bass Mono Maker Plugin to Cut Sub Infos from the Sides
2) Enhance the Stereo Width a Bit with a Dedicated Plugin
3) Use e.g. Aroma to Add Saturation
- Think About the Type of Saturation you Want
- e.g. “Salt” Adds Odd Harmonics as well, which is Not Necessary for EDM
- e.g. “Sugar” Gives a Typical Tape Bump in the Bass Range, which is Less Necessary when Used Hardware
- so here “Pepper” and “Chili” are the Candidates
- Increase Pepper to About 50% with a Color of 30%
- Increase Chili to About 50% with a Color of 30%
- Compensate Output for Volume Boost (-0.26%)
4) Insert a M/S Capable Plugin EQ with Solo Listen and Check the Side Signal for Aggressive Frequencies
- i.e. Cut the Frequencies in the Side Signal (e.g. can be a Narrow -8dB Cut at 760Hz)
5) Use a Specific De-Edger Plugin Such as BX Refinement to Control Harsh Frequencies between 3kHz and 3.5kHz (i.e. Smooth Out Digital Frequencies)
- but you can also Use a De-Esser or a Dynamic EQ
6) Use Mastercheck to Regularly Compare Against Original Mix
Final Control
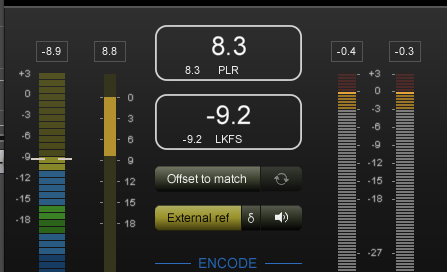
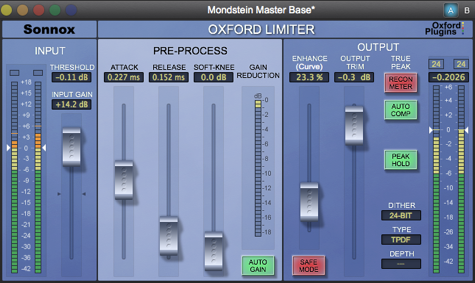
1) Use the Limiter and Mastercheck to Check for Final Integrated Loudness, Dynamic Range and Intersample Peaks
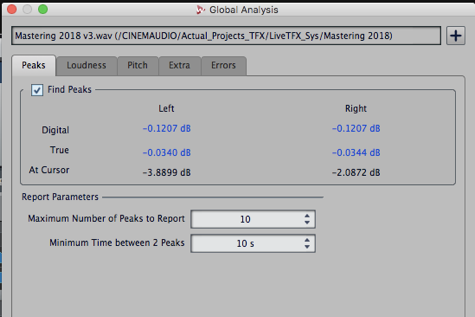
- the Goal is to Not Peak, but Go Straight to the 0dBFS Marks or have a -0.3dBFS Headroom for Encoding
a) First Look in Mastercheck if and How Much Basic Peaks are Detected
b) If any, Reduce Threshold in Limiter (which Limits More and Lowers the Dynamic Range) and Increase Output Trim on the Other Side and Check Again
c) When you have More Headroom Left, Increase the Gain of the Limiter a Bit
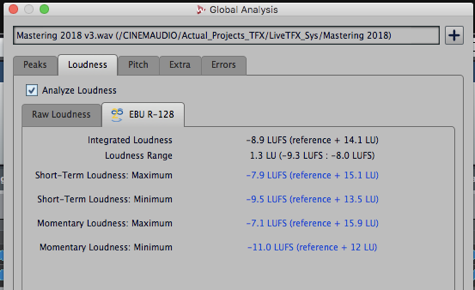
d) Also Take a Look at the Integrated Loudness that Sits for EDM at -8 to -9 LUFS (Dynamic) or -5 LUFS (Compressed)
e) Repeat Steps Until Mastercheck Does Not Clip (Be Sure that TP Feature is Active)
2) Render the Track and Open in Wavelab
- Cut the File, Set a Small Fade-In and Fade-Out
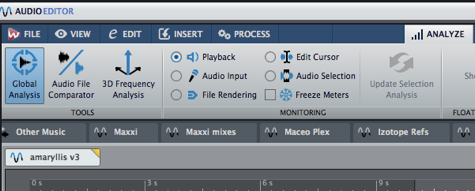
3) Do a Global Analysis in Wavelab on the File and Double Check that the RMS and Peaks are Where they Should be for Consumer
Leave a Reply