
General
– Overview of all Synth Models from Subtractive Synths, FM Synth, Wavetable Synth, Granular Synth to Sample Based Synth
– Learn to Construct Sounds based on these Synths
– at the Heart of all Synthesis, in Fact of All Sound (be it Natural or Synthesis) is the Sine Wave as the most Simple Fundamental Building Block and All the Common OSC Types (Saw, Square, Triangle…) are just a Combination of different Sine Waves at different Amplitudes
Additive Synthesis
– at the Heart of all Synthesis, in Fact of All Sound (be it Natural or Synthesis) is the Sine Wave as the most Simple Fundamental Building Block
– the Idea comes from a Calculation called the “Fourier Transform”, which Enables you to Re-Produce Any kind of Sound
– Fourier Transform is an Equation which allows Physicists, Transform the Way we Visualise Sound from what we Call the “Time Domain” (How many Times the Cycles the Wave Repeats per Second) into something we Call the “Frequency Domain” (What Frequency the Wave Repeats per Second)
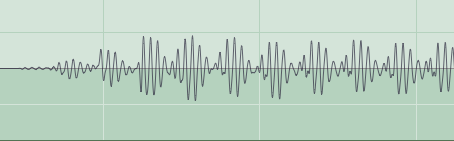
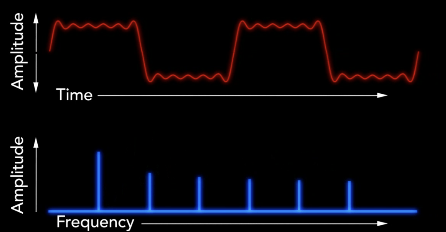
– when we Look at a Wave Form, we have Time on the X-Axis and Amplitude on the Y-Axis whereas the Wave Form Runs above and below the Centre Line
– a Sine Wave on the other Hand has Equal Amounts on Positive and Negative Side in its Nature and occurs only as 1 Frequency in the Fourier Analysis
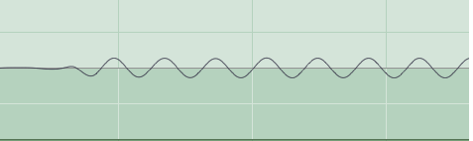
– Keep in Mind that a Sine Wave Does Not occur in Real Nature but it can be Synthesised and be Broken into a Series of Sine Waves (Partials) to Re-Produce any Real Nature in Theory and that is what Fourier Transform is All about
– and to use Sine Waves along the Fourier Transform Mathematics is what Additive Synthesis is All bout
– so Once we have a “Sound A” as a Waveform visually as a “Time Domain”
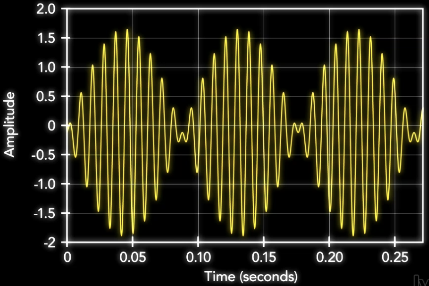
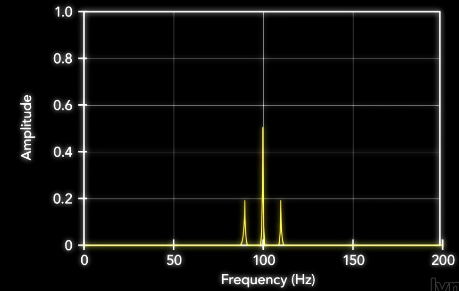
– with the Fourier Equation we get the same “Sound A” in the “Frequency Domain”, i.e. Instead Time we have Frequency on the X-Axis (almost as Seeing the DNA of a Sound )
– this Picture illustrates How a Complex Square Wave (Red) can be Broken into a Series of Sines (Bright Blue), together with individual Frequency Amplitude (Dark Blue) per Sine Wave
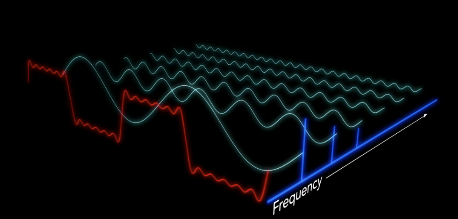
– in Our DAW we See individual Frequencies and their Amplitude as Single Spikes
Subtractive Synthesis
General
– Is the most used Synthesiser Model, whether it is Analog Based or Virtual Based
– Subtractive Synth means, a Sound is derived from a Sound Source (from Waveforms) and then you are Subtracting Things from it (via Filters, Envelope, Modulators)
– Workflow starts from a Keyboard Trigger (Midi Keyboard) –> Sub Oscillator (Sin, Tri, Saw, Sqr) –> Filter Section (Cutoff, Res etc.) –> Amp Env (ADSR) –>Output Stage
– Saw Wave is suitable for a Variety of Things Such as Pads, Strings or Basses etc.
– Sine Wave is suitable for Sub Basses or to Fill Single particular Frequencies, other than that not used as much as other Waveform because the Harmonic Content does Not really change whether you use Filters etc.
– Triangle Wave is suitable for Reed or Flute Instruments
– Square Wave is suitable for “Cheesy” Sounds such as Chip Sounds, Computer Sounds etc.
Subtractive Tools Overview
PWM Pulse Width Modulation
– If you look at a Square Wave, you see Equal Top and Bottom Length
– with a PWM you are able to Shorten or Lengthen Form
– gives almost a “Detune” Kind of Effect
– was used a lot in Times instead Oscillators where Oscillators to Modulate the Sound were quite Expensive
Filter (Filter Modulation)
– Allow you to Shape the Sound towards more Bass, Treble or Mid
– Done by using a Variety of Filter Shapes as Bandpass, Lowpass etc.
– to Re-Create the Characteristics of a particular Instruments Filter Curve with Filter Modulation
ADSR (Amplitude Modulation)
– Normally found in the Synth “Amp” Section
– Allow to Shape the Sound over Time
– to Re-Create the Characteristics of a particular Instruments Envelope Curve with Amplitude Modulation
Velocity Effects
– to Re-Create the Characteristics of a particular Instruments Velocity Curve
– any Instrument Sounds different whether you Hit it Hard or Soft (being it a Guitar, a Tom Drum etc.)
– usually Created in a Synth by Mapping Velocity Effect to different Velocity Stages (being it from Velocity 0-25 Weak Attack, 25-50 Medium Attack, 50 – 75 Normal Attack etc.)
Scaling Effects (Keyboard Tracking)
– Map Sounds across Keyboard with different Characteristics from Bottom to Top
– also called “Keyboard Tracking”
– for Example a Sound gets brighter towards the Higher Range of a Keyboard
– usually Created in a Synth by Mapping Filter, Pitch (or any) Effect across the Keyboard Range
Detune Effects (Stacking)
– means you Stack different OSC together and then Detune them to create Large, Big, Lush and Chorus kind of Sounds
– Stacking is Done by adding Voices (only works in “Poly” Mode)
– Unison is also a Mode of Stacking and Detuning Sounds and is used for Basses a lot
FM Synthesis
– Yamaha made it popular with their DX 7 and DX 9 Synths
– good for Bright and Harsh Sounds, Bell Sounds, Marimba, Basses
– very different to Subtractive Synthesis in Term of the Source Sound
– FM Synthesis has Operators that are Pre-Stacked in different Ways
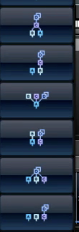
– the Principle is any of the Pre-Stacked Forms is based on a specific Carrier as the Basic Sound Source, then you Modulate that Carrier with a next Carrier (for Example B) by a certain Ratio and so on with a 3rd Carrier C that affects B and down to A etc.
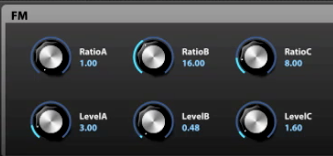
– Note that the Pre-Stacked Form can also have a Carrier starting on D down to C etc.
Wavetable Synthesis
– became popular with the PPG Wave Synth and it is Based on another Sound Source than other Synths
– it is based on Wavetable that acts as a “Look Up Table” to produce the Sound
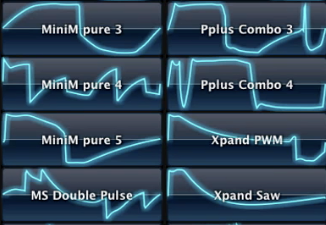
– with “Start Shift” you Offset the Phase, thus Change the Start Point and Get Another Sound
– with “Symmetry” you change the Wavelength (similar to PWM)
– other than that similar Tools as ADSR, Layering etc. are Available to Tweak Sounds further
Granular Synthesis
– a bit like Sample Based Synthesis
– basically Splits up Samples in Tiny little Grains and then allows for Editing their Lengths, Envelopes or Reorder completely New etc.
– Works better for Long Sounds
Leave a Reply