
General
– a Reverb can be Viewed as a Whole Bunch of Parallel Resonators
– Each Like a Little Bell that Rings Out when Excited by the Input Being Close Enough to it in Frequency
– Basically there is a Source Sound Wave that Goes Out and Builds an Initial Reverberation at a First Boundary (ER), then Comes Back (Pre Delay = Time between Source, the First Boundary and Source Again) and Finally Reflections that Go Out Collide with Reflections that Come Back to Form the Late Reflections (LR)
- Mainly Early Reflections, Late Reflections and Pre-Delay Determine the 3D Space Character of a Reverb
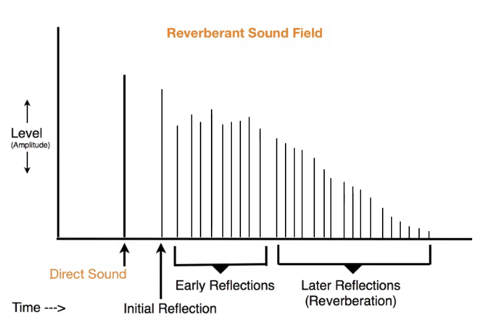
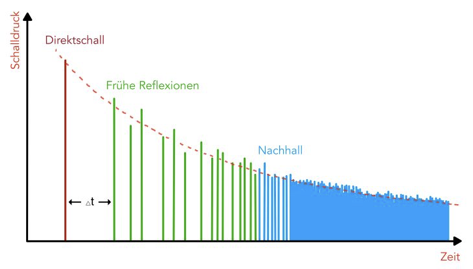
– a Reverberant Sound Field, either Real World or in a Reverb Unit is Divided into 3 Distinctive Sections
Initial Reflection (Pre Delay)
– is the First Reflection that occurs in the Room and these Reflections come from the Reflected Sources Closest to the Sound Source
– the Larger the Room, the Larger the Gap between the Direct Sound and the Initial Reflection
– also Called Pre Delay in Reverb Units
– the Closer we are to a Source, we Do Not Hear any Reverberation until the Sound Travels Out then Bounces Back and this Time in-between is the Pre Delay Time
– e.g. if you are 5 Feet Away from the Nearest Boundary you get Approximately 10ms Before the First Reflections get Back to you
– as we Go Further Away, the Pre-Delay Goes Down
Early Reflections
– Initial Reflection is Followed by a Pattern of Reflections Unique to that Particular Space, called “Early Reflections”
– these Early Reflections Define the Characteristics of the Room such as Echoey, Dry, Large, Small, Club, High Ceiling, Church, Counter Hall etc.
– are the First Order Reflections that Happen in a Space
– i.e. a Sound Wave Goes Out, Hits a Boundary and Comes Back
– the Closer we are to a Source, we Hear More of the ER (Early Reflections) and Less of the LR (Late Reflections)
Later Reflections
As Sound Bounces around the Room, “Later Reflections” are Added, sometimes Tailing Off after the Original Sound has Stopped
– these Later Reflections are the Actual Reverberation (or Reverb Tail)
– a Sound Wave Goes Out, Hits Different Boundaries in Different Ways (i.e. Bounces Around a Room) Before it Comes Back
– the Further Away from a Source we are, we Hear More of the LR (Late Reflections) but Less of the ER (Early Reflections)
RT60
– The Length of the Reverb Tail, the Time it takes for the Reverb to Decay to a Level 60dB Lower than the Original Level
– Often seen in Reverbs but also relevant for Measurements of Rooms etc.
– Describes the necessary Time it takes, until a Test Tone “Lands” in the “Diffuse- Field” by 60dB below the Original Signal
– in a Noisy Environment it is Hard to judge if the Signal has “Landed” that 60dB below (you simply Do Not hear enough Details), so you may also use a RT20 (RT Signal must only Fall 20dB below Original Signal) which can be Calculated later on to RT60
Reverb Types
Chamber Specific
– Echo Chamber was the original High-End Reverberator
– Small to Medium Sized Space with Highly Reflective and Irregularly Shaped Walls
– Chamber Characteristics are a Rapid High Density and Avoidance of noticeable Wall Slaps
Concert Hall Specific
– same Characteristics as Hall, Differences are Listed below
– Updated Version of the Oldest Lexicon Algorithm used a lot in the Late 70ies and 80ies
– A Less Dense Reverb
– allowing you to add Lushness without Stepping on the Dry Source material
– a Quite noticeable Modulation, causing Strong pitch Effects at Higher Settings
– more used in Pop (than in Jazz/Classical)
Hall Specific
- usually the Principal for Classic Ensembles
– Add Height
– rather Large with Wall to Wall Distances that are several Tens of Meters
– Small Halls may be used for Smaller Ensembles
– Hall Characteristics is a Very Low Initial Reflection Density with little reflection Energy before 60ms to 100ms (Milliseconds)
– Density Built up is more Gradual because of the Larger Distances between Reflecting Surfaces
– Reverberation Time is somewhat Longer as well
– in most Halls Lower Frequencies Reverberate Longer than High Frequencies
– these Characteristics are Shared by the Random & Concert Hall as well, but the “Lex Hall” is Smoother with a more even Decay
Plate Specific
– Plate Reverb is a Large, Thin Sheet of Metal suspended Upright under Tension on Springs
- Transducers attached to the Plate Transmit a Signal that makes the Plate Vibrate, causing Sounds
– Add Depth & create Space between the Instrument and the Back of the Mix (Plate preset in UAD Reverb or Lexicon Chamber)
– a High Initial Diffusion
– relatively Bright and Coloured Sound
– Designed to be Heard as a Part of Music
– Well Suited for Percussion
Random Hall Specific
– same Characteristics as Hall, Differences are Listed below
– a Gradual Built-up
– Well Suited for Complex Ensembles (Orchestra)
– its Reverberators Change over Time in controlled Ways to avoid Buildup of Tinny, Grainy, Metallic or other Coloration’s
– ER are User adjustable in Amplitude and Delay
– some Skill is used to Set useful Reflection Patterns, Contracted or Expanded in Time using “Delay Master” Control and the overall Level of the Pattern can be Set with the ER Level
– Notice the “Irregularity” in the Decay, so for Precisely Pitched Instruments this Modulation may Not be the Best Choice
Room Specific
– One of the Most Flexible Algorithms
– Add Distance between you and the Instrument with proper Early Reflections
– Reflection Patterns can easily be Selected, Scaled and Equalised “On the Fly”
– also the Room Size can be Changed or Reversed “On the Fly”
– Room differs to the other Reverbs by the Fact, that the ER Impulses are taken from Actual Room Measurements (being Large, Small, Odd etc.)
– so the Illusion of Space is delivered by Actual Room Measurements and Adjustments are mainly made by Scaling and / or Reversing to maintain Original Quality (which is in most Cases sufficient)
– Used Room Reverb in Post Production (Dialog and Effect Room), Reverbs (Large Reverberant Spaces that differ from Hall), Effects (Reversed for Backward Effects and Gated Sounds
Vintage Plate Specific
– same Characteristics as Plate (Differences are Listed below)
– EQ Touch of the PCM96 Plate but also from Older Plate Implementations
– with different Input Diffusion
– a additional Pair of Echo Voices
Reverb (Delay) Tips
– Some Tips you should Consider when using Reverb / Delay in Production / Mixdown
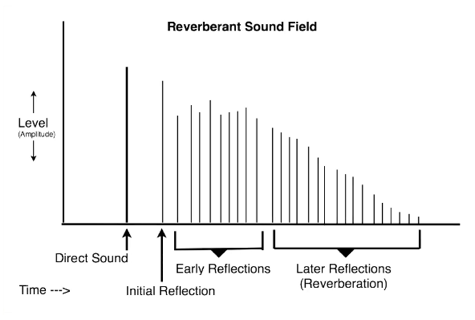
– Remember a Typical Reverberant Sound Filed Consists of the Early Reflections and Later (Denser)Reflections (Reverb Tail / Decay)
– the Specific Pattern of Early Reflections is used by Our Hearing System to get a Sense of the Character of the Space, namely the Size and Space of the Room
– the Later Reflections Add a more Diffused Reverb Tail
Choose the Right Reverb on Material
– Short Ambience Reverb = Busy Rhythmic Tunes (Short)
– Halls = Vocals (Echo & Dense)
– Plate = Most Kind of Parts (Even Response)
– Rooms = Most Kind of Parts (Simulation of Room)
– Spring = Special use such as Guitar (same as Plate but with Strings instead Plates)
Reverb Length – Do Not Hang Too Long
– Reverb Length may be Titled Decay, RT60, Tail
– Smaller Spaces and Rooms with a lot of Absorption Material have Shorter Reverb Times
– Larger Spaces have a Long Reverb Tail
– Orchestral Concert Halls are Known for having a Rich Reverberation Sound, but Notice that the RT60 Times is No more than 2 Seconds for Most Concert Halls (Carnegie Hall 1.2 Seconds)
– Often A Decay Time that is no Longer than 1 Beat at the Songs Tempo is the “Default”
– 1 to 1.5 Seconds for Strong Percussive Sounds
– Shorten the Tail according to Material Length, so as if it Shines that there is No Reverb at all is another Way to Go
– in General you can Say that 0.5, 1 and 1.5 Seconds are a Good Way to Start, from there Adjust to the Given Style of Music
Wet / Dry Separation
– the More Reverb you Add to a Signal, the More Distant a Sound Seems
– but Leads, Vocals or Solo Instruments often Need to be in the Virtual Foreground of a Mix
– One Trick to Handle Balance between Background / Foreground is the Wet / Dry Knob of course, Values above 50 Make the Sound Belong to the Next Room
– Another Trick to Handle Balance between Background / Foreground is the Type of Reverb, especially Room Reverbs with a Extended Early Reflection Control let you Adjust precisely the Depth, but also Plate Reverbs have by Nature a Dense Sound-field at the Start and may Provide a More upfront Quality on the Track
– a Last Trick to Handle Balance between Background / Foreground is the Initial Reflection Time (Pre Delay) which Sets a Gap between the Initial Sound and the Initial Onset of the First Early Reflection in the Reverb, i.e. a Slightly Longer Gap may Suggest a somewhat Larger Space, but it can also Serve to Add a little Separation between Source Sound and Reverb
Avoid Bass Build Up
– in a Physical 3D Space Reverb Comes at the Listener from All Directions, while the Direct Sound (Music) usually Originates at Front
– our Hearing System Separate the From Arriving Music from the Later Room Sound to the Sides and Rear
– but when Reverb is Applied to a Stereo Mix, it is All Coming at the Listener from the Front and as a Result the Reverb can easily Overwhelm the Direct Sound and One Way is the Build up of Excessive Bass from the Reverb
– a Natural Reverberant Sound Field Tends to Favour Lows & Mids over the Highs through Absorber, Including People in a Room (i.e. High Frequencies are Broken much Faster)
– One Trick is simply Short Decay Times
– Another Trick is to Avoid Reverb on Low Frequency Instruments, especially if the Sounds are Long by Nature (a Kick may Benefit from a little Reverb)
– a further Trick is to Reduce the Low End Frequency Inside the Reverb Unit itself (as a lot of Reverb have a HP / LP Filter or you use a dedicated Equaliser after the Reverb)
– a Last Trick is to Reduce the Decay Time for Low Frequencies only, a Feature that also a lot of Reverbs Provide these Days (Separate Decay Time for Lows and Highs)
Avoid Unnecessary Reverbs
– Reverb is Not the Effect that is Inserted on a lot of Tracks which Makes Sense, especially in a Live Performance
– also often All the Instruments are Subjects of the same Room Tone
– a Typical Scenario is that several Tracks gonna have the same Reverb applied to them and those Track are Configured in a Send / Return Setup
– typically you use Post Fader Sounds, so whenever you Change the Level of a Track in a Mix, the Reverb you Setup for that Track will be Preserved
– so a Send / Return Setup will give you Control over the Dry Mix (Track Fader Level), Wet Mix (Aux Return Level) and the Balance between both (Aux Send Level)
– in this Setup 3 Critical Things to Consider, the Aux Return Level should stay at Unity Gain, the Reverb Mix should be at a 100% Wet, don’t use the Bypass on the Reverb Instance to Bypass the Reverb temporarily as you End Up with Inappropriate Routing Levels (use the Faders “Mute” button instead)
Do Not Go Alone
– as much as is True that a Live Performance is in One Room, the Fact that the Positioning of the Players, Movement and Absorption are Different will give different Results, i.e. Different Depth
– but in a Studio Setup everything Comes Out of the same Monitors, Placed at a Fixed Position, therefore 1 Reverb only is probably Not Sufficient to Create a Real Sense of Depth
– many Mixers use 1 to 4 Reverbs in different Send / Return Configurations, so any Track can Access different Types of Reverbs Instantly
– the Specific Pattern of Early Reflections is used by Our Hearing System to get a Sense of the Character of the Space, namely the Size and Space of the Room
– the Later Reflections Add a more Diffused Reverb Tail
– a Lot of ER Mixed with the Dry Signal will Pull a Signal Back into the Virtual Space, while the Tail will Tend to Sit Behind the Dry Sound at a Distance
– so a Combination of 2 Reverb Instances Reflecting ER and Tail is often used to Balance this Relation more Accurate
– i.e. the First Reverb will be a Shorter Room Primarily Consisting ER with a little bit of Tail, but the Second Reverb will be a Larger Space with Less ER and a More Prominent Tail, so in Mixing you Send a little to Both Reverbs and Blend to Taste
– e.g. Likely using the Large Space you Keep a Track in the Foreground with a Light Reverb Behind it, or Sending More the Small Room, Pulls the Part into the Virtual Space a Bit more
– the Drum has often Separate Reverb with a more Ambient Type, Heavy on ER to Pull the Drums Back into the Virtual Sound Field (to Avoid “Wash”)
– the Vocal also has often Separate Reverb with a more Open / Diffused Type, sometimes with a Longer Initial Reflection Time (Pre Delay) and often with Lower Diffusion or Density Settings
– in a Algorithmic Reverb, Diffusion and Density Set the Spacing and Regularity of the Initial ER (Lower Values give the Sound a More Echo Quality)
– as always, any Track can have its Own Additional Reverb Inserted to Add Special Character
Leave a Reply