
- to Make a Sound Thicker with a Delay, Use Prime Numbers Such as 3, 5, 7, 11 etc., this Will Set Focus Less on Repetitions as 2, 4 etc. Would Do
- Notice that Some EQs Provide a “Pre Amp” Option (Line and / or Mic), so if you Attenuate Certain Frequencies (Surgical Usage) you can Increase this Pre Amp Parameter to Compensate the Energy (whereas if you Boost you Normally Use the Output Gain Parameter to Equal Gain)
- Remember that in Todays 32bit Float DAWs, there is an Theoretically Enhanced Amount of Headroom of Around +1500dB Dynamic Range which Protects Signals that Overload and Send Meters to the Red from Actually Distorting (Some DAWs have therefore a Orange Peak Meter LED to Indicate that it is Technically an Overload but No Problem), i.e. you can Push a Individual Track Fader Above Zero Without Distortion and Benefit from the 32bit Floating Point Resolution, but you Must Avoid Clipping for the Master Fader (Main Out) at All Costs Before Rendering
- if a Mix Exceeds the 0dBFS, Usually a Mix Engineer Lowers All Tracks Together or Lower the VCA Fader (Although you Could also Simply Lower the Master Channel and the End Result Would be the Same)s
- a Good Engineer Works More with Shelf Filters on the Lows and Highs to Remove “Empty” Frequency Areas via Slope and Gain
- Avoid General Low Cuts, Always Listen to the Fullness of a Sound and Only Cut the Lows Before Falls Apart, Remember the Feeling is More Important than Rules and Multiple Low Cuts will Cause All Kinds of Phase Issues etc. (when Not in Linear Phase Mode)
- e.g. Below 50Hz you can Easily Cut Most Non Low Sounds, but for Cuts Above 50Hz you Should Consider to Automate a Low Shelf Filter (Not HPF)
- it is Crucial to Retain the Fullness and Original Harmonic Structure of a Sound as Much as Possible or a Mix Becomes Thinner and Thinner
- Phase Rotation on a Shelf Filter Applies at the Respective Set Frequency (Falls Back Normally)
– Phase Rotation on a Bell (Peak) Filter Applies at the Start and End Frequency (Falls Back Normally)
- – on a Low / High Cut (HPF / LPF) Filter, the Respective Set Frequency is Phase Rotated by 180° (that is Why Low Cuts are Tricky)
- – Mixing at Low Volumes can be Better than at High Volumes, i.e. if a Track Sounds Impactful at Low Volumes it will Sound Impactful at High Volumes (but the Opposite is Not True)
- – 96Hz (or 88.2kHz) Sample Rate Advantages = at 44.1 you Get a Total Spectrum of 22kHz while at 88.2 you Get a Total Spectrum of 44kHz and the Aliasing will then be Pushed Out of the Human Hearing Range Above 22kHz (Based on Nyqvist Theory), Especially Tube / Amp Simulations / EQs Compressors / Limiter and Reverb Effects May Sound Cleaner, Sounds Even More Analog as Digital Artefacts are Reduced Because of the Increased Nyqvist Range, but also Plugins and Converters May Sound Better
– as a Rule of Thumb, if you Only Need to Cut 1 Narrow Range it is Better to Use 1 Peak Filter Band and Dip that Range (Instead Boost Everything Else), on the Other Hand if you Want to Boost a Sound to Pop in 1 Range it is Better to Dip Everything Else but Boost that Range to Level Match the Loss of the Everything Else Dip (e.g. Low Shelf Up to 200 at -2.7dB/ High Shelf Down to 2kHz at -2.7dB / Boost Peak Filter at 1khz +2.9)
– for Optimal Noise to Level Ratio when Recording Instruments / Vocals, Try an Average Level of -18dBFS (= 0VU) and Peaks that Go Not Too Much Over -10dBFS (but Notice that Percussive Tracks Need More Space)
– Send All Sounds to the Same Reverb with the Same Send Amount but in “Pre-Fader” Mode and then use the Individual Volume Fader to Bring an Instrument Closer or Put it Further Away, or even Automate the Fader During Composition to Mimic Different Distances
- Pan Dry Bass to (Maximal) +2 or -2, which can Sometimes Help to Create Space for Kick
– Try Long Tails for Strong Attacked Sounds such as Percussion, Shorter “Damped” Verb for Orchestral Parts and for Solo Instruments a Very Wet one for Best Integration
– Try to Make Both the Fundamental Kick and Bass Dead Center, but Nothing Else or You will Clutter Up the Punch of Kick and Bass (i.e. there Must a Really Good Reason to Put Anything Else than Kick and Bass Dead Center)
– Try to Drive Quite Hard into Your Favorite Harmonic Distortion Unit (i.e. Large Boosts) and then Compensate with a Clean Digital EQ to Bring Down the Crazy Curves to Actually Suite the Material, this Brings Out All the Detail and Lushness in a Source while Still Being Relatively Transparent
– Anti Glue is Achieved by Very Long Attack Times and Very Short Release Times, i.e. Too Much Glue is More Often the Case and with Very Long Attack Times and Very Short Release Times Compressor Settings you can Avoid to Glue Even More
- in General, Shift the Start (and End) Point of Any Given Sample to Find the Sweet Spot / Click of the Instrument
- HP Filter the Vocals Before Using Pitch Tools for Better Pitch Detection (e.g. About 150Hz at 48dB Slope), also Exclude Breaths from Going e.g. into Pitch Correcting for Better Results
– Remember that Clean Mono Means Left and Right Speaker Play Exactly the Same Signal so when you Sum the 2 Channels Together you Get 100% the Same Sound Again, i.e. but as Soon as the Left and the Right Speaker have Different Content the Signal Jumps Around and when you then Sum the 2 Channels Together it May Cancel the Sound at Some Points
- Imagine a Mix in 3D, i.e. Left Cube = is the Left Position / Speaker / Ear (Refers to Stereo Imaging), Right Cube = is the Right Position / Speaker / Ear (Refers to Stereo Imaging), Top Cube = Refers to the High End of the Frequency Spectrum, Bottom Cube (Refers to the Frequency Spectrum) = Refers to the Low End of the Frequency Spectrum
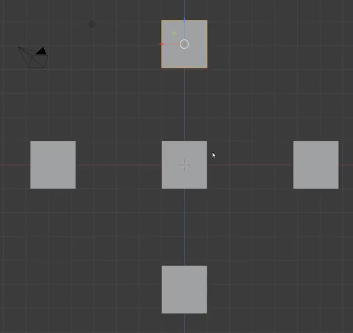
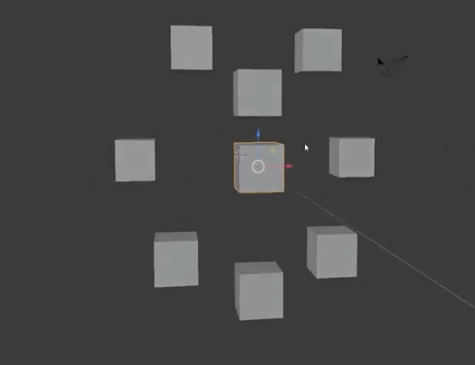
- then you can Copy the Cubes and Create Depth by Pushing Some Cubes Back and Reposition Them (e.g. you can also Position / EQ Rear Elements to Mimic Top vs Bottom)
- Find Ways Not Let Your Brain Trick You, e.g. Close Your Eyes when Bypassing (or Look Somewhere Else, Look Down)
- When Using Bus Compression During Mixing Use it at the Early Stage and Mix Into it so the Bus Compressor Responds to You and You Respond to the Bus Compressor, but there is No Point for Bus Compression at the End of a Mix (i.e. All you Do is Change the Mix you Thought was Finished)
- Remember that Panning can Hide Phase / Polarity Issues which can Lead to Weaker Mixes, i.e. Does Not Solve the Phase / Polarity Problem (Check in Mono and Fix)
– a Proofed Way to Set Levels (if you Mix in Mono or Stereo) is to Turn Down the Speakers to the Point you can Lead a Discussion and then Adjust Levels at that Low Speaker Volume, or you can also Use Headphones but Put them on the Desk and Turn Volume Down Again and then Adjust Levels at that Low HP Volume
Leave a Reply