
History
– Since the Introduction of CDs, Mastering and Delivery has been Getting the Audio Levels as Close to Digital Headroom as Possible
– First using Level Normalization to get the Peaks as Close to Digital Headroom
– then when that was Not Enough the Loudness Wars Broke Out and Compression Techniques were Adapted to Make a CD Louder than anybody Else’s CD
– Radio Station on their Side, Tried to Manually Adjust the Many Different Levels so the Listener Did Not had to Change the Volume all the Time
– but the Introduction of even More Compression Techniques (Brickwall Limiters etc.) as Part of the “Interstation Loudness Wars” Ruined that Dynamic Range even More
– when Streaming Services Came Along and Builded Playlists from CD Tracks, the Found Out that the Perceived Volume Going Down from Track to Track, which was Very Annoying and they Complaint
– so More and More Streaming Services Normalise the Different Tracks to a Loudness Figure which is an Average for the Whole Track, rather than Normalising to a Peak Level
– this means that we Need to Change the Way we Mix and Master Music, Especially when Delivering to Streaming Services Like iTunes, YouTube, Spotify etc.
– Notice that Normalising to Loudness Does Not mean that the Whole Track Comes Out to the same Volume (Flat Sound), the Opposite is True as we can Re-Introduce Lost Dynamic Range and No Longer Need Compress the Track to Make it Sound Louder
Loudness Wars Tricks to Increase Perceived Volume
– we have a Track with a Headroom of -22.1 dB or LU (1dB is Equivalent to 1 LU)
– the First “Trick” was to Normalize the Track to Increase Loudness, so the Highest Peak Reaches Digital Headroom
– i.e. Original has a Loudness Headroom of -22.1 LU and After Normalisation -17.4 LU, which Gives us a Increased Perceived Loudness of 4.5 LU
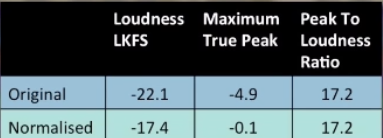
– but Still was Not Enough in the Modern Loudness War
– so the Second Step to “Trick” (Increase) the Perceived Loudness without Increase the Peak Level was a Gentle Limiting (i.e. Dynamic Processing with a Limiter)
– e.g. a Subtle Limiting Increases the Loudness by Further 2 LU, but when we Already are at Digital Headroom we can Not Go any Higher
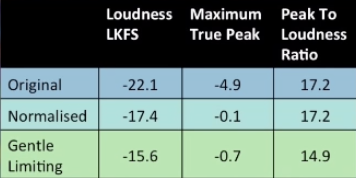
– to Actually Go Higher, the Third “Trick” is to Increase Loudness with Compression Techniques, which Compromises the Dynamic Range
– as the Modern Loudness Wars Increased, so Did the Amount of Compression (Brickwall) and the Breath Of Life in Music Suffered from a Squashed Dynamic Range
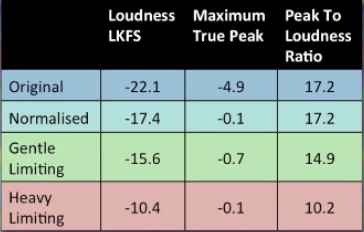
– Now that Streaming Services Normalise the Different Tracks to a General Loudness to an Average for the Whole Track (rather than Normalising to a Peak Level), there is No Point on Compressing a Track to Make it Louder
– i.e. the Normalisation Does the same to All Tracks, so a Compressed would be Simply Turned Down in Volume so the Average Loudness Matches the Target Loudness
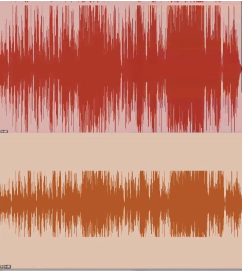
– the Peaks are then Nowhere Near Digital Headroom, means we are Left with a Quieter but Still Heavily Compressed Track with Loads of Wasted Headroom
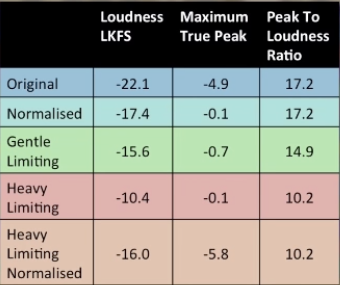
– so Nowadays, it is Far Better to use the “Gentle Limiting” (-15.6 LU) Process that Hardly Needs any Adjustment, as it Matches the Common Streaming Service´s “-16 LUKS Target “
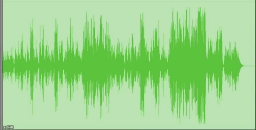
Tools to Match New Loudness Targets
– a lot of Plugin Developers have Tools to Help you Measure / Visualise / Compare / Match Loudness for the New Loudness Targets
– e.g. Nugen “Master Check” is a Loudness Meter that Response Like Our Ears to Perceived Loudness
– the Meter Shows the Average Loudness Over the Last 3 Seconds (Short Term Loudness)
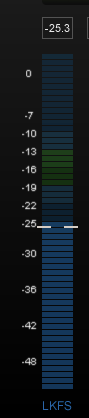
– the Loudness Number Displays the Average Loudness Since you Last Pressed the “Reset” Button (Integrated Loudness)

– then there is the “Peak to Loudness Ratio”, which is the Dynamic Range or How Much Audio Compression there is on a Track
– Green = Good
– Amber = OK
– Red = Warning that you Probably Overdo the Processing
– Notice that the Meter Shows the “Short Term Peak to Loudness”

– whereas the Numeric Display Shows the Peak to Loudness Ratio using the Average Loudness Since you Last Pressed the “Reset” Button

– Finally in the Meter Section there is the True Peak Meter to Make sure that you Not Go Over Digital Headroom

True Peak (or Intersample Peaks)
– Lossy Codecs are Required for Streaming Services to Save Bandwidth
– but Lossy Codecs Do Not Handle High Volume as Good as Lossless Formats, you Do Need to Monitor and Control Very Close to Digital Headroom
– Digital Audio is the same as Film, it is Made of a Series of Samples or Digital Snapshots
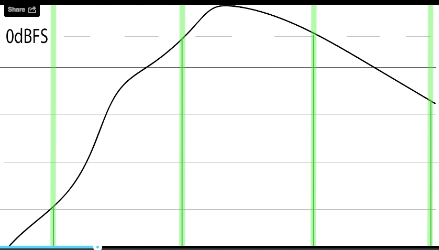
– a Traditional Peak Meter (usually at 44.100 Times per Second), Does Not Show what is Going On between the Samples or Snapshots
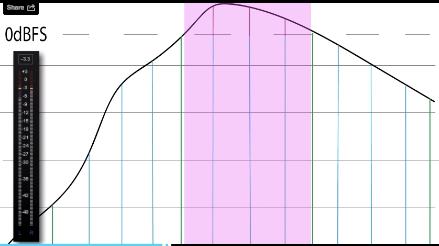
– so when you Convert Back to Analog, what is between the Samples or Snapshots can Lead to a Boost of 6dB Above Digital Headroom = Intersample Peaks or True Peak (TP)
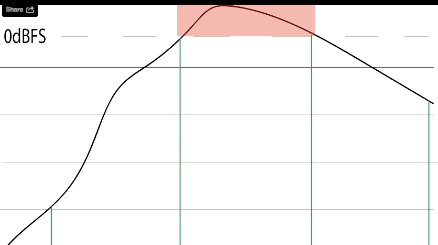
– so you Need Tools and Limiters that Work to the True Peak Information, because they Show what is Likely to Happen between the Samples when you Convert Audio Back into Analog
Going for the New Loudness Normalization
– the Best Practice is to Already Mix the Tracks to Be Around “-16 LUFS”, so the Music Services Do Not have to Turn Up or Down your Music to their Preferred Target Loudness (which is usually “from 14 LUFS to -16 LUFS”)
– when you Convert to Mp3 Make sure that the Audio is Not Going Above -3dBTP
– when you Convert to AAC Make sure that the Audio is Not Going Above -1dBTP
– as a Test you can Insert Nugen Master Meter, then Nugen ISL TP Limiter and Finally another Instance of Nugen Master Meter to Monitor Level after the Limiter
Leave a Reply