
General
– Create a Master Chain for Final Mastering (including “Reference Limiter” and “Dithering” )
– the Chain is Optimized for EDM and uses Ozone Plugins in Particular (but Any Plugins will do)
– the Ozone Standalone (v7) can Hold Up to 6 Modules, so we Need 2 Instances of Ozone here (or use Single Plugins in DAW)
– Notice that any Effect may Occur even when Meters Do Not Indicate Reduction or an Effect (be it Gain Reduction, EQ, Saturation etc.)
– in this Example the “Match EQ” Feature is Not used, but it might be a Good Idea to Adapt the Fullness of a Respective Reference Track that has a Similar “Sound Image” as a Test to See what the EQ Must Do to get the Reference Tracks Image
– also you can try some Ozone Mastering Presets that might Fit the overall Picture of the Reference, as well as a Test to See what the EQ Must Do to get the Reference Tracks Image
– in General, Listen to the Reference Track and Toggle to your Track then Ask yourself, Is one Louder? Is One Brighter? is One Wider?
– also Compare similar Sections such as Intro, Chorus, Hook etc., and Compare Vocals always separately from Instruments
– Make use of the Ozone “Auditioning” Auto Match Gain, which Equals the Level between an Active Module vs Bypass

– always Check Result on different Environments and Go Back to Master Process if necessary
– Remember that beside Shaping a better Sound Image during Mastering, a Process that makes the Song Louder is a Correct Step
Order of Plugins in Chain
1) Vintage Tape (Analog Tape Machine Saturation)
2) Digital Pre EQ (as a Surgical Tool in Linear Phase Mode)
3) Vintage Compressor
4) Multi Band Dynamics (Compact Image)
5) Dynamic EQ (Corrective Usage)
6) Multi Band Exciter (Harmonic Exciter)
7) Reverb
8) De-Esser (Reduce Annoying Frequencies, Combfilter, Harshness, Unfilter)
9) Vintage EQ (Analog Colouring)
10) Digital Post EQ (Transparent Equaliser for Ultimate Frequency Adjustments)
11) Stereo Imager (Adjust Stereo Width)
12) Vintage Limiter (use to Sweeten Things instead as Loud-Maker)
13) Maximiser (Limiter as Loud-Maker and to Match Reference Level)


Order of Actual Adjustments
Getting Started
1) Vintage Tape / Tape Machine (Plugin 1)
– give the Mix a Low Frequency Glue and Soften the High End
– choose 30 ips
– “Bias” is an “Inaudible” High Frequency Signal applied to Magnetic Tape during Recording during Recording to improve Signal Quality by Aligning the Magnetic Particles
– Too Dark Mixes may Benefit of a Lower Bias Setting (Slider Down), whereas Too Bright Mixes Benefit of a Higher Bias Setting (Slider Up)
– Add more Odd Harmonics with Slider Up
– Low Emphasis is your Control over the Low End Boost whereas High Emphasis may Re-Introduce High Frequencies due to too the Loss of High Frequencies caused by Tape Machine Treatment (Increase both and then Reduce to Find the Sweet Spot)
2) Maximiser (Plugin 13)
– Maximiser “Squashes” the Transients and Creates RMS Power
– Especially IRC III & IV Preserve Transients and allow for Distortion-Free Limiting
– Ozone Splits into many Bands and only Applies where really needed to Preserve Dynamics
– Set the Limiter Output Ceiling to about -0.3 dB is “Recommended” by Izotope (Minus 3/10 of a dB)
– the Limiter is by the Way “Auto Tracking” your Material, you can Play with Limiter Character to Influence the Tracking Behaviour (Slower Release = Fat, Fast Release = Bouncy)
– “Stereo Unlink” gives the Option to Limit the Left and Right Channel separately
– “Transient Emphasis” will Bring Out (Extend) Transients, in the Case you have a Very Compressed Signal (usually Not Active)
– to Make Things Loud usually you Limit/Compress Bass and Mid
– always Make sure you get the Master into “Commercial Loudness Zone” (Reference Track) at the Start in the Mastering Process, i.e. Don’t Change the Picture with a Big Loudness Change at the End of the Mastering Process (of course you can Make some Small “Threshold Adjustments”)
Bonus: Reference Track Detailed (4 Steps)
– Before Continue Mastering, Right Now we need to Calibrate the Mix-Downs Level to a Commercial Level via a Reference Track
– this Prevents you from Changing the Picture Completely with a Big Loudness Change
Step 1
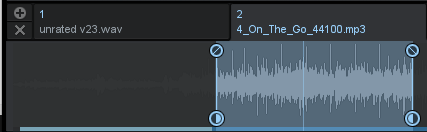
Load a Reference Track, i.e. a Finished Mastering Track in the Style of your Track into DAW (Magic A/B) or Ozone Standalone Slot
Step 2
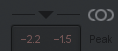
Adjust the Output Ceiling Level of the Ozone Maximiser by Searching the Peak Level of the Loudest Section of the Reference Track
– means to Look at the Input Peak Level of the Reference Track, which in this Case is around -2.2 for the Left Channel and -1.5 for the Right Channel
Step 3
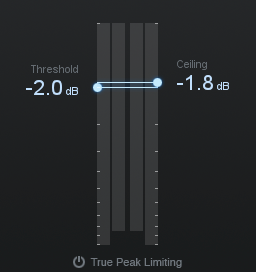
Adjust the Ceiling of the Maximiser with the given Result from Step 2 to around -1.8 dB (Difference of L+R)
– this will Limit your Track to Never go Above that Level
Step 4
Finally Adjust the Limiter “Threshold” of Your Track, so you get the roughly the same RMS Level as the Reference Track
– means the Reference has a RMS Level of around -14.3dB (on the Left) and -15.4dB (on the Right)

– so Start Limiting until your Track is in the Ball Park of +/- 14dB

– in this Case a Threshold of -13dB was needed
– make sure to choose the Optimal Ozone where IRC III or IV are the Best (Transient or Classic)
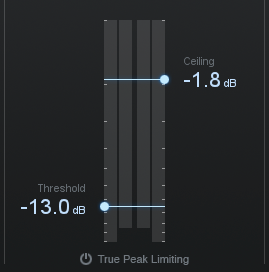
– Reference Level Matching is Done…..
3) Digital Equaliser (Plugin 2)
– Pre “EQ” Adjustments, mainly as a Reductive EQ andFirst Mid/Side Corrections (we Master “Mid/Side” Definitive with the Stereo Imager Module Later in the Chain)
– Linear Phase EQ Mode is Recommended (Ozone EQ in Digital is Linear Phase and Analog is Minimum Phase)
– Remove Lows of the Sides, from 0 to 400Hz (depending on the Track)
– Create a Bump on Mids at around 400Hz – 600Hz (depending on the Track)
– Check the Very Low Subs in Mid and Side
4) Vintage Compressor (Plugin 3)
– just Tighten Up a little with an Analog Compressor
– Be sure to Filter Out the Low Frequencies in the Internal Side Chain to Maintain all Low Frequencies (and Not Compress them)
– about 2:4:1, Moderate Attack
5) Multi Band Dynamics (Plugin 4)
– Sweeten Frequencies per Band, Band meaning usual 4 Splits in the Total Range of 20´000Hz
– use the Crossover “Learn” Feature which Automatically Suggests Band Splits based your Material
– Priority here is to Control Low Frequencies and Make the Sound Image more Compact
– “Env” is Perfect for Low Frequencies (“Peak” is better for Mid/High)
– a Ratio of 1:5 is Enough, Moderate Attack and Fast Release (Activate “Auto” Feature to Compensate for Level Changes)
Focus Sound
6) Multi Band Exciter / Harmonics (Plugin 6)
– especially the Mid and High Range Benefits
– Tube / Tape are often the Best Sounding
– use the Learn Function and Make use of Oversampling
7) Multi Band Stereo Imager (Plugin 11)
– Treat it as the Definitive Mid / Side Correction Tool
– as in General, Narrow Low Content (Band 1+2) in Stereo Width but Extend High Content (Band 3+4)
– Notice that the Ozone “Learn” Feature Helps to Divide your Content into 4 Optimal Frequency Bands
– be sure to Check for “Crossover Phase Issues”
8) Post Digital Equaliser (Plugin 10)
– Make Very Subtle Global Post EQ “Finishing Adjustment” with a Transparent EQ
– as the “Mix-Down” Must Deliver Definitive Contours and the Pre EQ has already Small Changes, this Post EQ Adjustment almost “Does Not Exist”
– often a little (Narrow) Boost on the Low Body at around 40-100Hz and (Broader) High Boost at around 3-4 kHz
9) Vintage EQ (Plugin 9)
– the Benefit of “Fixed” Frequency Shapes as in Analog EQ´s can be Helpful instead of the Less Audible “Continuous” Digital EQ Approach
– i.e. this can be used as the “Additive EQ” since Pultec Styled EQ´s can be Pushed Quiet a Bit
Finishing Touches
10) De-Esser (Plugin 8)
– Level Out the Harshness of Sounds in-between the Sensitive Frequency Boundaries that Affect the Human Ear the Most
– i.e. use either a De-Esser / Dynamic EQ or any Special Dynamic Harshness Controller such as Essence or Unfilter for Example
11) Reverb (Plugin 7)
– Reverb can be useful if Not enough Reverb is Present in the Mix Down
– or use Reverb to Enhance Mid /Side Experience, e.g. add only Reverb to Lead Sounds while Leaving the Background Intact
– or simply to “Sweeten” the Whole Mix
– a Plate Reverb can be useful as it Does Not Really Create Distance (MAT Plate for the whole Mix Down??)
– anyways, a Nice Sheen and Sort of “Mid Range Gloss” is what you can get which you should Miss when Bypass Reverb
– use Reverbs Internal Low-Pass (8000Hz) / High-Pass (800Hz)
12) Vintage Limiter (Plugin 12)
– Just before the Final Maximiser, we Add a Vintage Limiter to Minimise “Blurry” Peak Distortion in a Gentle “Vintage” Manner
– in Tube Mode with Very Little Gain Reduction whereas Release Time Depends more on the Current Material
– as always, Listen to the Signal since Gain Reduction (or any Effect) may Occur even when Meters Do Not Indicate Reduction or an Effect (use Bypass)
– Ceiling Does Not Matter here (as it is Done in the Final Maximiser)
Bounce Down
13) Dither
– use Default Settings
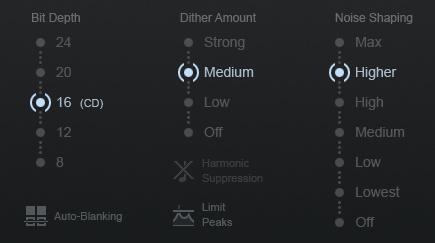
14) Bounce in DAW or Standalone
– in DAW, use 16bit /44100 WAV as well (No additional Dither or Normalise etc.!!)
Leave a Reply