
1) Usually there is a Separate Recording Specialist, Mixing Specialist and Mastering Specialist
– so in Order to get the Best Results, Don’t be and an Island and Invite some Fresh Ears
– other People will Analyze the Sound Image of your Track Different
– and if you Do it on Your Own be sure to You have Fresh Ears before Staring to Master at all
2) Don´t Mix and Master, i.e. Details and the Big Picture are Different Things
– so in Order to Distinct the Focus between a Mix and a Master, Make a Longer Break (Few Days is the Best)
3) Be sure to have a Proper Listening Environment
– Consider where the Final Result will be Played, e.g. Theatre Room, Cinema, Live, iPod etc.
– Make use of Additional Speakers, Headphones, Room Calibration Tools
4) Think Master, Not Mixing
– Use Tools (Plugins) that are Designed and Dedicated for the Mastering Process
– Mastering is Not the Stage where Huge Adjustments should be Done (e.g. like Big Compression, Big EQ Values etc.)
– EQ Adjustments Go from 1-3 dB and Compression about 2 or 3 dB Gain Reduction
– Instead the Focus Must be on Technical Weakness that Might Subtract from the Most Positive Listening Experience such as Poor Imaging, Stereo Balances, Phase Issues etc.
– i.e. the Mix Process is for All the Details, if needed Go Back and Re-Adjust
5) “Managing Bands” is something used a lot in Mastering, i.e. Split Incoming Signal to Several Bands that can be Adjusted Individually
– e.g. using a Multi Band Compressor or Multi Band Limiter can Help to Balance the Spectrum Content
– Ratios between 1.5 to 2.1 are often Enough
– Slower Attacks like 10ms or so to Preserve Transients
– Longer Release Time like 60ms or so to Avoid “Pumping Effects”
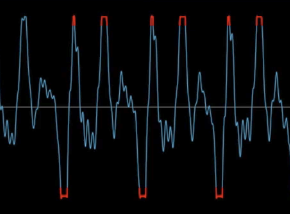
6) Brickwall Limiter is used to Protect “Digital Overages” in the Digital World and it can be used to Increase Perceived Loudness
– Brickwall Limiter are only available in the Digital Domain
– in Theory, a Limiter Prevents a Signal form Exceeding Threshold
– Settings of -2dB to – 3dB are often Enough (until -6dB a Transparent Limiting is still Possible)
– Notice that in the Analog World a Limiter can only Greatly Reduce the Gain, but Not Absolutely Stop the Signal
– so basically a Analog Limiter is just a Compressor with a Very High Ratio, from 10:1 or 20:1 Upwards is Considered as “Limiting”
– when Signals Exceeds the Analog Limit, the Analog Limiter Starts to “Soft Clip”, “Saturate” and “Analog Distortion” Occurs in a “Pleasant Way” (because there is still Analog Headroom)
– but in the Digital World, the Limiter Stops the Signal Going Above the chosen dB Mark (e.g. 0dBFS)
– when Signals Exceeds the Digital Limit, the Digital Limiter Starts to “Hard Clip” and “Digital Distortion” Occurs in a “Un-Pleasant Way” (because there are No more Numbers to Work with when the Waveform has Clipped)
– a Proper Meter may Help you to Detect the Distortion of Transients (as the Limiter Attacks the Transients that Peak to Gain New Headroom)
7) Focus also on the Technical Issues and use Metering Tools for that
– i.e. Concentrate on Left vs Right Balance, Stereo Field, Phase Issues, Spectrum Content Energy, Loudness Standards, Transient Attacks, Peaks etc.
8) Compare your Tracks against a Commercial Tracks Tonality
– but Avoid to use Reference Tracks that are Converted to Lossy Codec Formats, try to Find CD 16bit or even a HQ 24bit Version
Leave a Reply