
- the Ear is Most Responsive from 1kHz to 5kHz
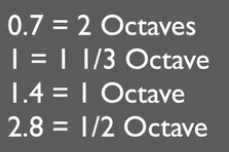
– Q Factor Ranges are 0.7 = 2 Octaves, 1 = 1 1/3 Octave, 1.4 = 1 Octave, 2.8 = 1/2 Octave
- it is a Good Practice to Sometimes Exaggerate Options in a Plugin and Go to the Maximum in Order to Hear when it Breaks Down and / or Starts to Introduce Artefacts, then you can Hear and Address the Issue Better (e.g. Similar to Work into a Mix Buss with Compression)
- Chorus is a Creative Tool to Manage Harsh High Ends of Any Kind, i.e. Bring Live to the Phase Relationship and Smooth Out Hard Phase Edges
– Remember that an EQ is in German “Entzerrer”, i.e. it was a Tool Thought to Lower Level at a Specific Hertz (that you can Raise the Level Should be More Seen as a Goodie)
- if you Detail Out the Mids First, you can then Better Balance Out the Lows and the Highs
– it is Advised to Not Trick Yourself with Loud Volumes at Mixing, a Comfortable Level is one that let’s you still make a Conversation without Shouting (then Crank Up or Low Down Volume from Time to Time to Check where You are at)
- Make Usage of a De-Esser on a Reverb Bus Instance (after Reverbs), for Example to Attenuate Vocal Sibilances in the Reverb Tail (e.g. 3kHz – 5kHz)
– the Bass Fundamental is Commonly Sitting Around 45-55 Hz
– if you Correct a Mixdown’s overall Level to -3 dB to -6 dB before Mastering, Rather Adjust the Individual Tracks Faders and Not just the Master Fader (Floating Point Processing is Required to Avoid Mathematical Inaccuracies which Happens by using just Master Fader)
– Hearing Sensitivity is Non-Linear and Varies Depending on the Listening Level of a Sound in dB SPL, i.e. Hearing gets More Linear at Louder Levels and therefore a Good Calibrated Environment is Important (at Lower Velocities you Do Not Get the Final Lows and Highs quiet Right)
– Try to Pan Similar Sounding Parts (in Terms of Frequency Spectrum) to Separate Places
– In General Higher Pitched Sounds can be Positioned in a Wider Stereo Field without causing “Imbalance”
– the Ear is Most Responsive from 1k to 5k
– When Filtering Out Non-Relevant Frequencies of a Sound, the EQ Filter should be the First Process in your Chain (before Compressor or Effects), Try Dial in a Curve until you reach the “Core” of the Sound
– In General Higher Pitched Sounds can be Positioned in a Wider Stereo Field without Causing “Imbalance”
– Multiband Compressors are useful to Control Sub Frequencies
– a Lively Dynamic Range is About 10-12dB (Lower DR will Rather Sound Squashed)
– Listen to Left and Right Signal Individually to Better Know what you are Mixing and Compensate “Un-Equal” Balance of the Left / Right Ear
– Remember that a Closer Source Reverberation has a Lot of Early Reflections, i.e. Provides More Presence and Clarity (VIceversa More Distant Reverberation will Blend ER Part Differently with the Tail)
– if you Increase a EQ Parameter, Listen if it Starts to Introduce a Mask or Not, i.e. if a Mask Appears it is the Wrong Frequency
– Get Rid of Any EQ Band that you Do Not Hear a Difference when Bypassed, i.e. when it Does “Something” but Not the Right Thing then Disable it
– in General, Small Q Factors are Not the Best Way to Use in a Mix (Either Re-Record or Change Sample)
- Before you Touch Anything you have to have to Force Yourself to Imagine “What you Want?”
- Notice that Just as a Signal Loses Brilliance and High Frequencies Over Distance, also any “A-Dynamic Signal” (Non-Dynamic Signal) has the Effect of Being More Far Away than a Dynamic Signal, i.e. You can Limit Doubled Vocals More Heavily and Place / Fix Them in the Background, or Dip High Frequencies to Place / Fix Doubled Vocals Behind the Lead Vocal
– a Pro Trick for 2 Bus Compression is to Use the External SC Feature on the Compressor (if Available), and Feed it with the Bassline (or Kick Drum which is More Known), i.e. Instead the Internal SC that Uses the Whole Mix and Compresses on the Loudest Passages, you can Make Room by Feeding it with the Bass Only
Leave a Reply