
- if you Mix in Mono, Do Worry More if Same Panned Sources are Clashing Together than Worry on Sources that are Panned Opposite (e.g. Check Masking between a Background Vocal vs a Guitar which are Both Panned Left)
- Beside Checking the Final Product in Mono, Export the Song the Different Streaming Formats at Different Quality Settings (e.g. to Know What the Song Sounds with Awful Lot Codec Compression), this can Reveal a Lot of Useful Infos on Your Final Decisions
– Switch from Time to Time the Left with the Right Channel with a Simple “L/R Flip” Tool, i.e. Balance Different Frequencies / Levels from Left vs Right Ear
- if you have a Project at 44.1.kHz, it Might be an Idea to Upsample (or Re-Record from a Player to at Least 48Hz) for Mastering
– Always Match Loudness when Applying Plugins, i.e. No Enhancement = Change Settings or Delete Plugin
- be Sure to Switch between Different Listening Levels when Mixing, Try 3 Different Hearing Spots but Do Not Switch Continuously while Mixing Before the Fundament is Build
– Try Resonant HPF and LPF Technique to Focus on Most Important Frequency Fundamentals and in the Same Step Clean Unwanted Areas (e.g. Equilibrium HPF at 18dB)
– Avoid Too Much EQ Just to Fit a Sound into the Mix, i.e. Don’t Over-EQ and Try to Fix the Source First when Possible
- Again, a Good Mix in Mono Sounds Great in Stereo, i.e. When Mixing in Mono you have to Fight Much More to Create Space for Every Instrument which Leads to a More Sophisticated Mix (Versus Spreading the Instruments in the Panorama Very Soon)
- Make Use of Headphones All the Time, Use the Advantage having No Room Modes, be Able to Mix Everywhere with the Same Reference Points Check Crossfeed Problems
- It is Crucial to Compare the Mix / Master Progress at the Exact Same Level, i.e. Compare Before / After Only with Identical Level Matching and be Able to Hear the Difference as a Positive Progress, Because 1 Change from Plugin May be Small but from Plugin to Plugin it Adds to Make a Hug Difference
- Always Compress Drum Tracks Before Time Correct Them so when you Work on Transient they are Un-Affected by Compression, i.e. Compress Individual Drum Tracks and then the Entire Drum Kit and then Comping / Time Correct, e.g. After you have Compressed the Individual Elements Create 2 Whole Drum Stereo Tracks, Compress 1 Stereo Track via a 1176 for Bass Drum but Leave Out the Snare, and Compress 1 Stereo Track via a Distressor for the Snare but Leave Out the Kick
- for a Ultra Fat Kick Use a Side-Chain Key Gate to Trigger a Sine Wave with a 0.75 Second to 1.5. Second Decay, Tuned to the Lowest Root of the Song (Usually between 30Hz and 80Hz), it Should be Side-Chained with the Kick Drum and Mixed in Soft, Compress the Sine Wave (with a Gradual Release Envelope) with the Kick Drum Before Doing the Whole Mix
– Sometimes a Reverb on a Sub Bass can Do Magic

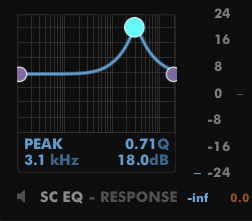
– Remember to Use the SQ EQ in a Dynamic Tool to Shape the Sidechain Trigger, e.g. with Below Boost at 3.1kHz it will Trigger the Response Much Sooner so you Don’t Need to Set the Threshold that Low, i.e. with this Technique you can Internally Tell the Dynamic Tool to Use a Certain Frequency as Trigger but to Affect Another Part of the Frequency
- Ear Fatigue Happens Soon, it is a Fact that when you Compare Settings, a) Very Soon your Brain Gets Tricked by Many Factors and b) The Second Version you Hear Often Sounds More Dull than the First Version you Hear (which of Course is Not Always True but Ear Fatigue Happens Soon)
- When you Look for the Best Spot to Boost Low End or Air Band in Mixing / Mastering, Make a Little Listening Pause between the Different Steps the EQ is Giving you (Reset the Hearing), e.g. on Analog Gear (or also Plugin EQ) you Might have Fixed Steps of an Air Band that is 3kHz / 4kHz / 5kHz / 8kHz / 12kHz, Now Dial In the 3kHz and Boost and Listen How the 3kHz Sounds, then Switch Off the Playback and Set it to 4kHz and Start Over Listening to What the 4kHz Does, and So On, Do the Same for Low End as Well as for the Mid Range
– Be Cautious with Mid Side Treatment, it can Cause Smeared Transients on the Mono and Leave a Mix Lifeless and Punchless
– David Lipson (Engineer of Sarm Studios) Used Heavy Compression on Vocals, e.g. 1176 with Ratio 8:1, Attack and Release at 2 O’clock, Hitting the Meter to the End
- In the Low End you Should Not have Too Short Release Times when Compressing or Parallel Compressing, to Avoid Distortion (and of Course Not Too Sharp Attack Times to Not Cut Away the Transients)
– Subwoofers can Playback a Deep Single Sine Wave Much Easier than than Complex Bass Wave, Try as an Example to Low Cut Original Bass at Around 100Hz and Layer it with a Pure Sine Wave to be the Lowest Bass
– Notice that there are EQs (Slick EQ) Where you can Insert a Fletcher Munson Curve (as the Last Instance), i.e. this Reflect Exactly Our Hearing Behavior so you can Mix at Low Levels Without the Risk of Overdoing Bass and High
– when You Duck Low End Stuff, Use Minimum Phase with at Least 4X OS, Look Ahead ON
– a Digital EQ is Perfect for Working in the High End, i.e. Bringing Transients on Vocals / Lead Sounds etc. to the Foreground
– a Passive EQ Design (which Works with Inductors) is Perfect to Work Within the Music, i.e. Working in the Mid Range
– EQ with Transformers on the Other Hand are Perfect for Building and Adding Overtones to the Bass Fundament
– A Method to Detect Clicks and Pops is to a) Invert Phase of Left Channel and then b) Sum To Mono
- Do Not Rely on Limiting via Stereo Mix Bus, Instead Use Saturation on Busses Limiting to Make Things Loud and Leave Limiting to Mastering, i.e. if you Process the Entire Song or Elements with the Same Process Everything Sounds the Same, so Make Sure you Decide What Needs Processing at All and What Not
– Be Aware of Plugins that have the Make Up Gain also Affect the Dry Signal, e.g. when you Use the Parallel Path and then Compensate the Gain with the Make Up Gain it will also Change the Dry/Wet Relation (which Changes Your Well Thought Adjustment), i.e. Some Developers have Configured so the Make Up Gain Does Not Affect the Dry Signal (which is Better)
– What is Often the “Thing” when you Talk About Digital Sources / Processes is that they are Very Clean and have a Lot of Transients Baked in the Source, e.g. a Clean Snare Might Not Cut Through the Mix Because of the Many Transients (you can Turn the Level Up or Down and Its Either Too Loud or Too Quiet), but when you Add Tape Saturation and / or Clipping to the Snare Itself (or to the Drum Bus) the Snare will Clip Transients and Increases the Perceived Loudness which also Gives You More Headroom and the Snare Cuts Better Through the Mix
- Notice that SSL Style of Compressor for EDM is Much Too Slow, i.e. Use Modern or Fast Compressor
- Notice that Some Reverbs Favor ER Instead Pre Delay, so those Still Appear Immediately
– When Mixing Layers, Think of the Space Between and Behind the Speakers as a Triangle, Sounds Near = Bottom of Triangle, Sounds Far = Peak / Top of Triangle, Beside Putting Layers Near / Far via Reverb in Pre Send also Use EQ (e.g. High Frequency Content Appears Close, i.e. Bottom of Triangle) and Panning
- Try Panning Voices L25 and R22
– On Vocals Often a Combination is Used, First a FET 1176 to Catch Peaks (12:1 but Very Small GR) Followed by a LA2A Opto Tube
– Spring Reverbs Were Mono (Back then) and Often Panned to the Same Position as the Dry Signal for the Most Authentic Effect
- If you Got Percussion and Drums Recorded at the Same Spot / Room, Use 2 Different Verb Settings to Give Each a Dedicated Space
- When Acoustic Guitar Sounds Good, Do Not Compress or Anything, Just Roll Off the Bottom and Add 12dB at 15kHz (Try an API EQ)
– If You Do Hear Aliasing, You can Do a Pre/Post EQ Shelf Where You e.g. Lower Everything Past 8kHz by 6dB Before Hitting
– Pop Vocal Very Basic Mix (After Recording) = EQ Low Cut at Around 90Hz —> Compress via 1176 by 4:1 / Fastest Release (Gives Breaths a Character and Makes Rather Pumpy Vocals) / About 10dB GR at the Highest Point (and Leave Quiet Parts Untouched by Compressor) / Attack Around Middle (or Fast for Crunchy Attacks) / Compensate Loudness with the Output Knob —> TG Chandler Limiter Set to Limit Mode / Recovery at 1 (i.e. Fastest Release Time) / About 1-2 GR Brickwall Limit Voice (Eventually Adjust 1176 if Limiting is to Recognizable)
– SSL E Comp Trick, 1) HP Filter at Around 30Hz and Filter Must be Pre Comp, 2) Set to Lowest Threshold and Ratio 1:1, 3) Increase Ratio Until you Get 3-6 GR, 4) Adjust Release to Tempo
- Use a Clean Fast Compressor to Control Initial Dynamics Before a Color Compressor (so the Color Compressor will Not be Supposed by Too Fast Transients)
– Always Check / Mix Stuff Left and Right Monitors Isolated, i.e. the Sound Should Come Only from the Left or from the Right and then EQ etc. to Compensate my Different L+R Hearing
- Beside Compress Reverb you can also Use a Transient Shaper Before Hitting the Reverb and Reduce Transient Slider so Transients are Not Pushing the Reverb Too Much (i.e. Insert Transient Shaper Before Reverb on AUX Track), you can also Increase the Sustained Part of Transient Shaper Before Reverb to Prologue Tail of Source Before it Hits the Reverb, Above Technique is Useful for Transient Heavy Material that Need Some Room but to Avoid Transients Overpower the Reverb Release
– Try True Mid Side to Isolate Either of the Channels and then Add Dual Delay to Fill the Gaps (Excluded Channels) Creative
Try a Combination of Chamber / Hall / Room / Plate, e.g. EMT 250 for a Glossy Kick Tail, Plate 140 for a Vintage Kick Tail with a Recognizable Sound, as an Exercise Try Switch the Reverbs on a Finished Mixed from Hall to Plate and or Hall to Chamber to Hear the Effect, for a 1969 Room use Hitsville or for a Glossy Room Again EMT 250, for 1983 Room Use the AMS RMS16, for Less Glossy More Digital the 480L
Leave a Reply