
Low End RTA Trick
– a Spectrum Analyser Shows the “Exact” Amplitude of all Frequencies of a Signal
– the Amplitude of Low Frequency Content in a RTA Spectrum Analyser Shows More Information by Nature than in the High Frequency Content, thus to Match the Perceived Loudness (because Low Frequencies Need More dB to Meet Perceived Loudness in dB of High Frequencies <-> Fletcher/Munson)
– sometimes it would be Good to have the Analyser “Balance” that Out so we can See better what other Frequencies in the overall RTA also Stand Out (i.e. you get a better Grasp of other Frequency Contents or Gaps)
- so “Tilt” will Reshape the Envelope by Setting a Custom “dB” Amount, i.e. Rotate the Graph
- Positive Tilt Values = Increase Displayed Levels of High Frequencies
– +3dB = Pink Noise is Shown Flat
– 0dB = White Noise is Shown Flat
Tilt RTA Example
1) Insert a RTA to a Track or Mix Bus and Adjust “Tilt” as Needed (Start with +3dB Tilt)
– use 3rd to 6th Octave Analyser
2) Observe the Low End of Other Songs
3) Look for any Peaks or Dips in the Low End
4) Adjust with EQ or Level Adjustments
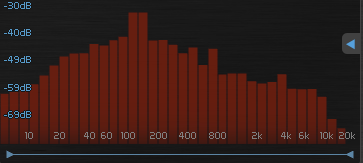
Dualism No Tilt (Default)
– you Clearly See the Peaks at around 130Hz

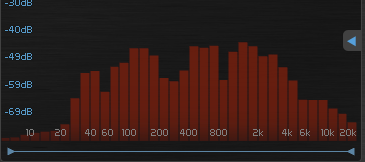
Dualism +3dB Tilt (Equal Low vs High)
– Peaks at around 130 Hz are Now (Visually) Less Present, but we Better See the “Build Ups” Around 600Hz plus 1500Hz and the Dip Around 300Hz

Resonant High Pass Filter
- You can Get Power and Energy by Taking Power Away “Unused” Frequencies and Harmonics in the Same Signal
- a Resonant HPF can Do that
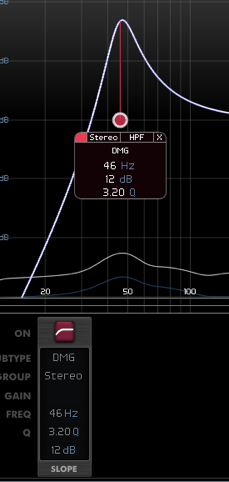
– Look at the Resonant Q in 3 Parts, “Low Q” (12dB per Oct) / “High Q” (18dB per Oct) / “Extreme Q” (36dB per Oct)
- Remember to Do Final EQ in the Context, i.e. Solo Listen and Correct a Sound May Fool You
– a Resonant HPF will also Show you Potential Places where a May also be a Fundamental
Basic Resonant HPF Workflow
1) Insert a Resonant HPF with a Rather High or Extreme “Q”
- Equilibrium has 4 Resonant Filters with Control Over “Q” Such as DMG (Default), Allpass, Chebyshev, Elliptic and Harmonics
– but also Butterworth (or Coincident) when Pushed with 48dB Per Oct can Do the Trick (but No Q Control)
2) Sweep with the Q to Search the Sweet Spot of the Instrument / Sound
- in General you Decide on the Lowest Clean 1st Harmonic, i.e. the Fundamental that Makes Up the Sound
- e.g. for a Kick Drum, that is Often between 50 and 100
- Notice that when you Sweep Through the Frequency Spectrum and a Certain Frequency Jumps Out Much More then it is Certainly a Potential Place
- but Remember that Things that Jump Out More can be Either the Place to Boost or to Cut and this is Where you Should EQ in the Context and Not Solo (Beside Judging with the Ear and Reference Comparison)
3) Then Dial Back the Q and Compensate the Gain
Example Resonant Filter EQ to Kick
- Use a Resonant High Pass Filter to Enhance the Real Body of the Kick
1) Insert a Clean EQ that has a Resonant High Pass Filter
2) Increase “Q” of Resonant Filter Quite a Bit and Set it to 1kHz for Start
3) Now Simply Lower Filter Frequency Until you Hear the Loudest Boom of the Kick
- this is the Fundamental Frequency and You Aim to Resonant that Peak Very Precise
- Neutron Resonant Filter
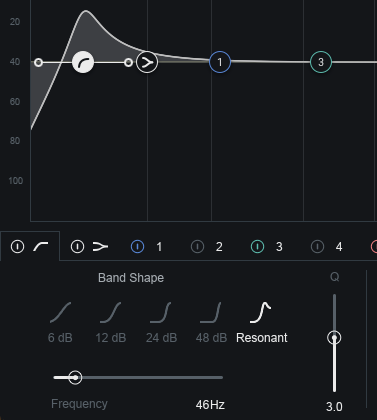
- IQ EQ Resonant Filter which Dips on the Other End
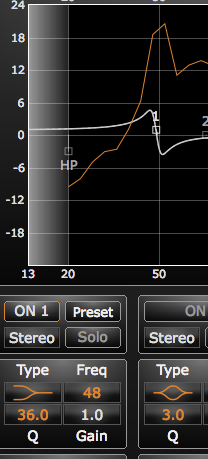
- or Equilibrium HPF with Filter Curve DMG, Allpass, Chebyshev, Elliptic and Harmonics that Allow Control Over “Q”
Low End Analysis
- Low End is Important as it Fills a Room with Energy and Gives Weight to a Track, also it Creates an Emotional Response Because of the Low Vibrations
- Beside the Above Facts, Low End also Supports Other Parts of the Frequency Spectrum
- the Idea is to Counter-Check when the Kick Starts to Lose Its Energy and / or when the Bass Starts to Lose Its Energy
- Distinguish between Short vs Long Bass Notes, is it a Short Punchy Type of Kick or Bass? Is it a 808 Type of Long Sustain Kick or Bass?
- i.e. is the Kick Pulsing or the Bass Sustaining on the Lows? Which One Should be the Chief of the Lowest Notes?
- the Optimal Case is you can Still Hear the Attack of Both and a Separated Spectrum whilst Listening Only from 0Hz to 60dB
- Notice that the Headphone Gives a More Accurate Picture of Low End Frequencies that Monitors, because of No Room Interference but also because a Headphone Better / Lower Plays those Frequencies
- Notice that E0 at Around 41.7Hz is the Lowest Possible Note Bigger PA / Systems can Re-Produce, i.e. to Produce Below E0 is Risky (e.g. D0 is at 36.6Hz) as the System Gets Weaker and Weaker the Lower the Frequencies Get
- “Sub-Bass” is the Term Only for the Fundamental Frequency of the Bass, i.e. Only 1 Frequency while the “Bass” Contains a Number of Frequencies Sits Above the Fundamental
- Avoid Layering Bottom End as it Introduces Phase Cancellation Whenever the Phases Go to Opposite Directions, i.e. Make Synth Monophonic to Allow Only 1 Note at a Time
- i.e. in Default Unison Mode (1), Both Speakers Play the Sound Source at the Same Time
- Whereas Unison with a Setting of 2 Both Speakers Get a Separate Sound Source and Both Speakers Play the Sound Source at a Different Time (when Changing the Detuning Parameter)
- and Since Most Systems will Combine the Left and the Right Speakers (i.e. Sum to Mono), the Chance is Great that when a Multiple Unison Voices in the Low Content are Combined you Get Phase Cancellation in the Low Content which Affects the Whole Track Negatively
- Notice that Many Spectrum Analyzers Sum to Mono as Well (i.e. L+R)
- Notice that High Passing a 60Hz Sub to 50Hz with a Steep Slope will Cause a Post Ring Tail, i.e. Once Audio is Rendered you See / Hear it Clearly
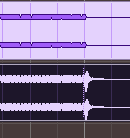
- (Nugen SEQ-S High Pass Filter Does an Excellent Job Preventing Such Post Ring Tails)
- Remember to DC Offset Your Material
Workflow Check the Mixes Low End
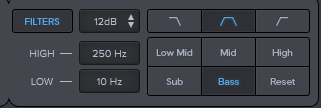
1) Start Listen to the Whole Song, but Focus the Low Content by Cutting the Highs Down to 150Hz (24dB or 36dB Slope)
- Focus on the Kick, What Do You Hear from the Kick Below 150Hz?
- Now Focus on the Bass, What Do You Hear from the Bass Below 150Hz?
- Try to Analyse if the Kick and the Bass Each have Enough Room for Themselves
- i.e. What Happens when the Kick Comes, is the Bass Gone or has the Bass Still Enough Room to Breath?
- Listen Especially to the Lowest Bass Notes Played as the Chance is Great those Mask the Kick
- or Viceversa Do they Disappear when the Kick Comes? (and that is the Tricky Part of Mixing Low End)
2) To Even Better Hear the Fighting Elements in the Very Low End, Cut the Highs Down to 20Hz and then Slowly Go Up Until You Think the Kick Pulse is there (36dB or 48dB Slope)
- i.e. you will Likely Start to Hear the Kick Pulse from Around 30Hz to 45Hz which is Too Deep and You Better Hi Pass the Kick to Leave Room for Bass Sustain Notes
– Often the Most Kick Energy is Around 70Hz to 110Hz
3) Still on the Same Exercise, Keep the High Cut Around 150Hz as Previous but Additionally Check with an Low Cut Filter (30dB Slope) when the Kick Starts to Lose Its Energy
– i.e. Increase Low Cut and Likely Above 50Hz the Kick Starts to Lose Its Energy
- Use Sonarworks HP to Better Hear the Frequencies and also Compare with References Low End Range via ADPTR
4) Use the Exact Same Low End Technique Above and Work from Sub —> Bass —> Low Mid —> Mid —> High
Kick + Bass Ideas
- Most is About Tuning the Kick, i.e. Pitch Shift It so it Makes Sense for the Whole Mixes Key
- it is Not About the Fattest Kick. but the Kick that Fits for that Song in Context
- Think About Low Content in “Super Sub Bass”, which is the Lowest Content and Sits on Octave 1 (or 2) at Around 40Hz to 80Hz
- and “Sub Bass” is the 2nd Lowest Content, i.e. Duplicate of Super Sub Bass but Sits on Octave 2 (or 3) at Around 80Hz to 150Hz
– Try Carefully a Little Plate Reverb on the “Super Sub Bass”, but You Need to Cut the Low End in the Reverb, i.e. No Reverb Below 60 Hz
Example Parallel Add Low End
- you can Make a Parallel Bus Group and Set a Custom Crossover in Order to Boost Only from Say 0Hz to 150Hz
1) Send Bass to a Parallel Bus Group
- i.e. to Blend In to Taste the Amount of Sub
2) Insert a Good High Cut and Set the Appropriate Crossover Point
- i.e. Trim the Range Frequencies to About 0Hz to 150Hz for the Parallel Effect in Order to Only Boost Basses
3) Insert a Pultec Low End Boost
4) Insert a Compressor with Rather Strong Compression but Fast Release to Preserve Dynamics
5) Blend In to Taste the Amount of Sub by Increase the Send to the Parallel Group Bus
Setup Level of Sub Bass
1) Look at the Levels of the 20 Best Reference Tracks in Your Genre in a Spectrum Analyser
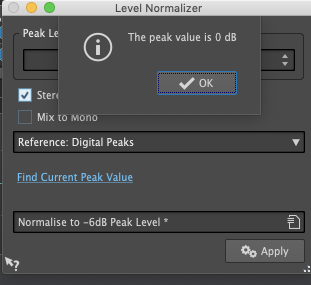
- First Normalise All Reference Tracks to 100% or Normalise All to the Same LUFS (e.g. Edit Source in WL and Play Original File Normalised to 0dBFS Peak, if it is Normalised!)
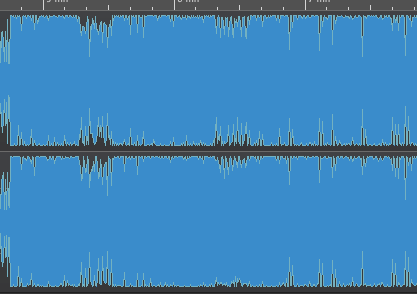
– Zoom Into the Analyser by Set a Rather Small dB Readout Range, e.g. a Range from About +4 dBFS to -30dB
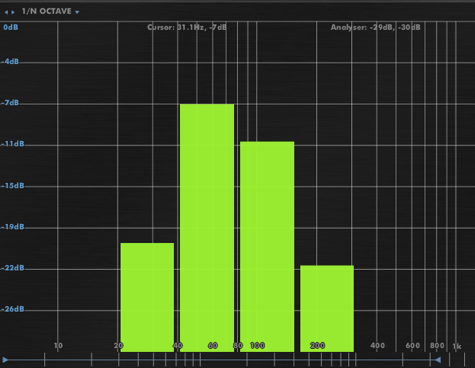
2) Typically for Modern Bass Music, Subs Always Peak Around -4 dBFS to -9 dBFS (Never Outside that Range)
– e.g. “Soak it” Subs Peak Around -7 dBFS
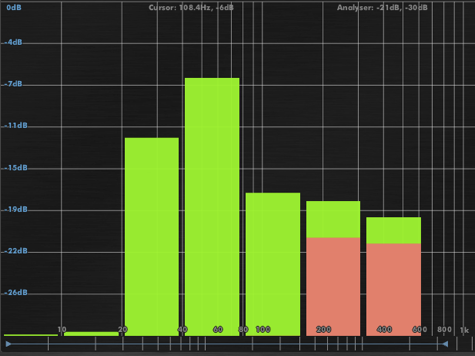
- “Lose Jenny” Subs Peak Around -6 dBFS (to -5dBFS)
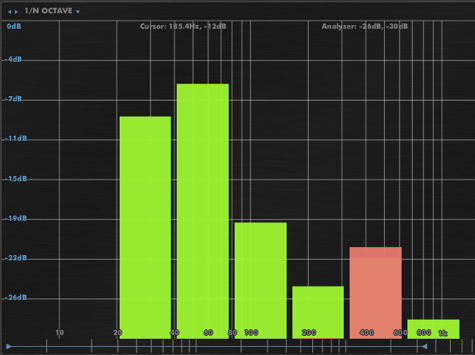
- “Maxxi Walk Right” Subs Peak Around -5dBFS (also “Set my Mind” Kick and Sub Peaks Around -5dBFS to -7dBFS)
3) This Way You Get Useful Information About the Options to Balance Subs in Level and their Differences Throughout the Song (e.g. Intro vs Chorus)
Phase Shift on Low Cuts
- Low Cuts with Minimal Phase EQ are Causing Phase Shifts Around the Cutoff Frequency and the Sum of Multiple Low Cuts Across Tracks will Certainly Change the Sound (Often Undesired)
- the Steeper the Filter Slope the More Phase Shift
1) Do Not Slap a Minimal Phase EQ Low Cut Everywhere
2) Listen to How it Affects the Material, e.g. Parts May Get Louder or Quieter
3) Existing Comb Filter May be Accented Even More
4) Re-Align the Phase
5) The Steeper the Filter Slope the More Phase Shift
6) Set the Low Cut so it has Minimal Effect on the Character of the Signal
– e.g. when a Sound has Its Body on 200Hz and You Insert a Low Cut at 150Hz it Still Affects the 200Hz (Depending on Slope), thus Set the Cutoff Frequency at a Lower Hz Such as 50Hz so it is Preserving the 200Hz Body
7) Try a Low Shelf Instead Low Cut for More Natural Results
8) Vary with the Cutoff Frequency when Using Across Several Tracks
- e.g. Do Not Set the Cutoff Frequency at 200Hz for All Instruments, i.e be Careful with the Same Cutoff Frequency Across Tracks as this will Introduce More and More Problems Around the 200Hz
9) Also Consider to Not Cutoff at All if is Not the Problem Anyway
- e.g. it Might be More the Low Mids that Need to be Adjusted
– Blind Cutoffs can Remove Warmth of the Mix
10) Try Linear Phase Instead Minimum Phase, but then be Cautious of the “Pre-Ringing Effect”
- i.e. Linear Phase will Add Something Before and After the Cutoff Point
- e.g. Especially on Low Frequency Content with Strong Transients
– thus Linear Phase is More for Subtle Changes and More for Mastering as the Pre Ring Effect is then on the Entire Mix
11) Another Option is “Natural Phase” which May Reduce Phase Shift
- Notice that Natural Phase (Modelled After Hardware), will Add a bit of Latency (and of the Most Time Minimal Phase is What you Need)
Better “Bass” with Opposite EQ Changes
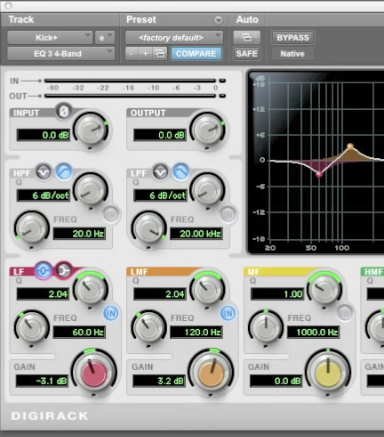
Step 1 (Low1)
– first for a Kick
– at least a 2 parameter EQ
– notch out the LF 3db at 60 Hz with at Q of 2
– boost 3db at 120 Hz with a LMF at Q of 2
Step 2 (Low 2)
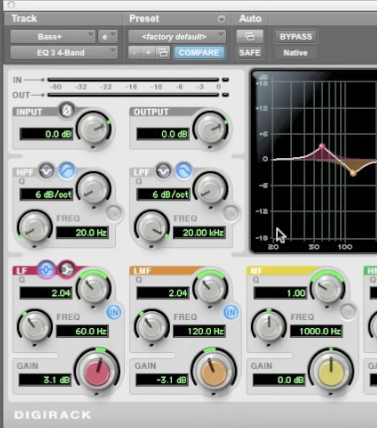
– next for bass do the opposite (see pic below)
– at least a 2 parameter EQ (same EQ)
– boost the LF 3db at 60 Hz with at Q of 2
– notch 3db at 120 Hz with a LMF (lowMidFreq) at Q of 2
Leave a Reply